Showing posts with label Windshield washer. Show all posts

Sunday, November 27, 2011

Battery Box Vent and Windshield Washer Redux

The EA plans for the mid pack battery box exhaust call for drilling a big hole in the passenger-side front wheel well.  I've been dreading making that hole and now that I'm at the end of the project I need to do something to get rid of the hydrogen generated during charging.  The position of the hose and hole drove me to get rid of the original windshield washer tank and install a small tank on the back of the mid battery pack.

Today I had an epiphany.  I was down under the car and noticed a large hole in the bottom of the body right below where the gas tank used to be.  The hole actually opens into a protected area where the steering rack lives.

I started by running an exhaust tube from the battery pack's fan port down to the hole.


I anchored the bottom of the tube to the brake line.  Not the cleanest thing in the world, but will suffice for our needs.  I have the leftover tube mount bracket so I'll see if it's viable next time I get a chance.


This gave me the room I needed to mount the original windshield washer fluid tank back in its home, and run the output tube to the new electric washer pump.


And the beauty is I got windshield fluid squirting out both jets the first time I tried it!  This meant that the replacement 924 electric actuator lever and new electric pump worked just as I planned.  I'm happy I was able to ditch the ugly but functional fluid tank and go back to the original.

Even though the tank cap looks like it's in a low position, I was able to get a lot of fluid into the tank.  I don't plan on sealing up the hole for the spare-tire-pressure-hose, as it will act as a pressure equalizer.

Saturday, November 5, 2011

Wrapping up the Windshield Washer System

Alert readers will remember that I upgraded the windshield washer control stalk from the fluid valve in the 914 to the electric version from a 924.  I also added an electric washer pump motor.  The last thing required in the system is a washer fluid tank.  The original washer fluid tank wouldn't fit into it's home anymore due to the fuel-tank battery box.

The local O'Reilly Auto parts place had a selection of plastic tanks intended for radiator overflow, and one was small enough for my needs.  It attaches with a spring clip.  After testing it in several places it looked like the best thing would be to attach it to the back of the battery box.  I carefully measured and marked, then installed some rivnuts in the battery box wall.  I had to grind down the back of the rivnut and the bolt as they were impinging on the space needed by the battery in that corner.


And here is the tank in place.  I ran tubing out the bottom of the tank and looped it around and into the input of the washer pump, making sure the bottom of the tank is above the pump to keep it primed.

The hole in the tank is in a very convenient location for filling.  Job done until I can test after final pump wiring hookup.

Sunday, September 18, 2011

Steering Column Rebuild

Now that I have the ignition cylinder restored and new keys cut, I could move ahead and rebuild the steering column.  I sanded, primed and painted the metal housings, then built everything back in reverse order.


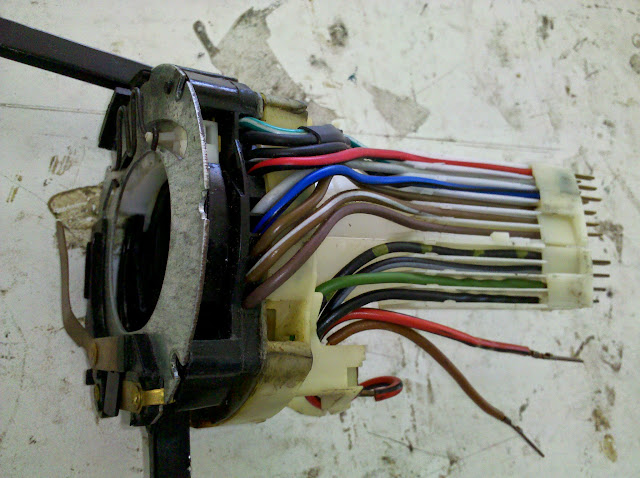
A major change I made was to swap in a 924 indicator / wiper stalk assembly, as it has an electric switch to control a windshield washer pump.  There is an article at Pelican Parts that guided me through the swap.  This is the 924 assembly I bought on eBay, after I moved the 914's white wire guides over.  You can see the red and brown wires at the bottom are extra, and don't have a guide slot. 


Next I added butt splices onto the two wires, to extend them down into the dashboard so I can wire them up to a fuse and the washer fluid pump.


Here I'm threading the extended wires through the gap in the bracket.  I gently slid the 914 wire guide into the bracket and slid the assembly over the steering shaft and onto the bearing.


I then ran the four long screws into the steering column bracket, securing the whole assembly.  And here we are, ready for the steering wheel.  This is an easy and very worthwhile retrofit, thanks to the evolution of the part from Porsche.

Tuesday, July 5, 2011

A flurry of Work - Wipers, Ventilation and Washers

Well it's the 4th of July weekend here and that means I get Monday off for the holiday.  I decided to take Tuesday through Friday off, giving myself a 9 day vacation.  I intended to really bang through a lot of work on the car and so far it's working out well.  The only downside is it's the hottest week of the year, starting at 112F on Friday, slowly dropping to a peak of 96F today.  The car is under a carport on the east side of my workshop building, so it's out of the direct sun, but it still gets very, very hot.  I'm starting early in the morning and staying hydrated, no problems so far.

With the former-fuel tank area successfully reshaped for the battery box, I had to restore and reinstall everything that goes in under the cowl.  Starting in deep and working my way out, I installed the windshield wiper mechanism.  After cleaning, it went in pretty smoothly.  Of course I forgot to take a picture of the control connector during the teardown, but a quick Google search found this great picture on the Pelican Parts forum.


With that in place, I cleaned and reinstalled the central airbox and driver and passenger flapper units, installed the hoses and attached the control cables.  Warning: this is a non-trivial process.  I used a combination of two tutorials on 914 World, an expansion and clarification of the tutorial by Chuckles McGroover (probably not his real name...) on his highly-detailed conversion blog, and the Haynes manual.  My sincere thanks to everyone for their pioneering work in this tricky area.

First I installed the defroster vents.  The original foam gaskets had turned to powder, so I used weatherproofing strips around the edge.  The tricky part came to sticking them through the holes in the metal at the top of the dashboard - the foam would catch and not go through smoothly.  I ended up gently scotch-taping some paper around the foam strips, slid them through the holes and gently pulled the paper out.


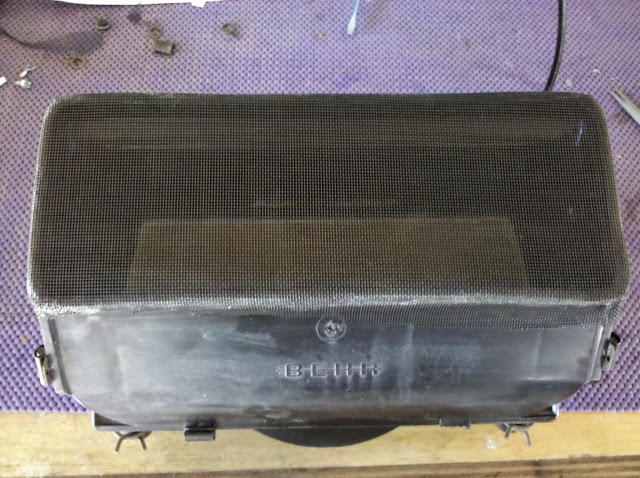
I then prepped the air blower box.  When I did the teardown, I found years worth of dirt, leaves and unidentifiable crap inside.  I decided to follow web advice and put a piece of screening material over the top of the box.  My first attempt to hold it in place was with a couple of long zip-ties, but the area is *very* tight and they wouldn't fit and ended up popping off anyway.


The working solution was to epoxy the screening around the edge of the box.  A fairly permanent solution, but I don't intend to be replacing it anytime soon.


Installation was a *major* pain, as it is so tight, right-to-left between the two mounting brackets.  I ended up loosening the upright brackets holding the top of the cowl to the shelf of the firewall.  It was just enough to force it into place and get the two screws started.


I then followed the tutorials to attach the control cables, and mounted the flapper units, then ran some new flexible hose where it needed to go.  So here is the complete job, starting with a wide view, then panning from driver's side to passenger.  I like the black motif.


Finally I worked on replacing the spare-tire-pressure windshield washer system with a small electric pump.  I ran the wires long and fed them through the hole where the washer hose went up into the steering column's valve, and will replace it with the 944 electric control I bought a long time ago.  I bought a new set of squirter nozzles since the rubber on the originals was in rough shape where it fits into the hole in the cowl.


Coming up in the next entry - the engine bay battery box goes in!

Saturday, July 10, 2010

Buying the remaining conversion components

Since we're so close to getting the car back and getting the electric conversion kit, I'm ordering the final components I'll need in the conversion process.

First up is a great piece of kit, a replacement fusebox from JWest Engineering.  The original fusebox uses Good-And-Plenty shaped fuses that are held in place by a tiny amount of friction.  The new fusebox has modern blade fuses, and bolts directly in place of the original.  For only $105, it's a great product that brings the electrical system up to modern standards.

Next is the PakTrakr battery monitoring system.  As I've written before, I've chosen this product to monitor the battery pack and have written a custom application for my Droid phone to display the data generated by the PakTrakr in a graphical manner, while tracking real-time trip distance and remaining miles on the charge.

As I've also written before, I'm abandoning the spare-tire-air-pressure-windshield-washer system.  I spent many hours trying to retrofit a tiny electric switch where the washer fluid valve was mounted in the windshield wiper / blinker mechanism inside the steering column.  Trying to make a tiny yet strong custom bracket just wasn't working out, so I started searching around for a Porsche 924 mechanism, which includes the electric upgrade.  I grabbed one for $50 on eBay, which is a great deal.  As a bonus it looks like the horn contacts are in great shape too.

I ordered a strip of basketweave material for restoring the dashboard.  The dashboard in my car has been hacked over the years, so this should give a nice clean look.

In the near future I'll be buying a Kenwood KDC-BT945U stereo.  I've chosen this unit because it has a USB cable that I can connect to my Droid.  This will allow the stereo to play the songs stored in the phone, and keep it charged while driving.  It also has a Bluetooth connection to allow me to make hands-free calls, with the caller's voice coming through the speaker system.

Sunday, October 18, 2009

Who's the U-Boat Commander?

I was reminded of this line from Risky Business, when the young and not yet insane Tom Cruise is at the Porsche dealership after the 928 rolls into Lake Michigan.  They open the door and water starts pouring out.  Well that was me today.  I decided to fill up the windshield fluid tank and attach the air pressure line from the spare tire (I'm not kidding, that's how it works!).  As soon as I hooked up the line, I heard a waterfall inside the car.  I went around and windshield fluid was pouring out from under the dashboard in at least 3 places.  I quickly removed the air pressure hose and got some bowls.  The driver's mat got the worst of it so I took it out and rinsed it off thoroughly.  I wonder if I'm going to get dribbled on driving down the road now...  I'll have to try to clamp off the line somehow.