This blog follows the progress of restoring and converting a 1973 Porsche 914 from stock to full electric drive, with an electric motor and half a ton of batteries. Now that the car is done and in storage while I live overseas, I'm adding descriptions and pictures of each Tesla location I visit.
Saturday, November 7, 2009
Windshield Washer Fluid Tubes
With the dashboard off, it was clear how the windshield fluid leaked all over the carpeting. Well there's your problem right there! The in and out hoses connected to the mechanical washer fluid switch in the steering column are just not attached at all. I've decided to replace this system with an electric pump, and that will go in once the gas tank is pulled. So for now I just pulled all of the hoses.
Wednesday, November 4, 2009
Upper and Lower Dashboard Removal
My task list looks like a lot of stuff is going to happen in and inside the dashboard, so it's time to pull it out. I couldn't find a description in the Haynes manual or any blogs or tech articles, so I'll document it here for posterity.
There is a lower dashboard and an upper dashboard. It looked to me like I needed to remove the lower one first, so that's where I started. I first removed the obvious showing screws, then carefully explored forward. There is a phillips screw on the far left side of the dashboard where it wraps around, in a hole possibly covered by a plug. There is a mirror of this on the right side too. There are five large screws along the bottom of the lower dashboard. At this point the lower dashboard should pull away from the underframe. Be careful of the left and right air vents as you gently pull. Here is what the lower dashboard looks like pulled from the car. I'm putting the hardware for each removal into its own ziplock bag, and labeling with a permanent Sharpie marker.
Next came the steering wheel. It's in the way and I need to pull it anyway to work on the windshield washer switch and the indicator return function. My car came with an aftermarket Momo steering wheel which has six flat-head hex machine screws. Those came out which released the horn plate. I disconnected the wire to the horn, exposing the big steering wheel nut. It's removed with a 27mm or 1 1/16" socket. You may need a steering wheel puller or you may be able to wiggle it off. Be sure to put a small tape marker on the wheel and the steering column housing so it will be easy to align when you put it back on later.
I carefully removed the ashtray (and will have to think about a different use for this space!). Remove the two phillips screws you just exposed.
Now comes the upper dashboard. There are two nylon nuts directly behind where the instruments were. You can only loosen with an open-end wrench.
Now come the tricky nuts. All of the bolts that hold the upper dashboard in place have their heads embedded in the dashboard. This means the dashboard bolts slide into holes and nuts are tightened in place. There are 2 nuts above the hole for the left-hand air vent and two mirrored in the right-hand air vent. There is one nut to the left and to the right of the instrument panel hole. Two bolts remain just above the radio slot, and you definitely have to remove the radio (if you have one) to get to them. That's it! Since there are so many bolts in so many hole and they're at different angles, it takes some jiggling and persuasion to get them all out.
One happy side-effect of this is I figured out how to tighten the floppy glove compartment. There is a metal strap that hooks into the right-side of the box, loops around the back and ends at a metal bolt on the left side. To tighten the glove box, just snug up the nut on the bolt. Now mine is rock solid!
There is a lower dashboard and an upper dashboard. It looked to me like I needed to remove the lower one first, so that's where I started. I first removed the obvious showing screws, then carefully explored forward. There is a phillips screw on the far left side of the dashboard where it wraps around, in a hole possibly covered by a plug. There is a mirror of this on the right side too. There are five large screws along the bottom of the lower dashboard. At this point the lower dashboard should pull away from the underframe. Be careful of the left and right air vents as you gently pull. Here is what the lower dashboard looks like pulled from the car. I'm putting the hardware for each removal into its own ziplock bag, and labeling with a permanent Sharpie marker.
I carefully removed the ashtray (and will have to think about a different use for this space!). Remove the two phillips screws you just exposed.
Now comes the upper dashboard. There are two nylon nuts directly behind where the instruments were. You can only loosen with an open-end wrench.
Now come the tricky nuts. All of the bolts that hold the upper dashboard in place have their heads embedded in the dashboard. This means the dashboard bolts slide into holes and nuts are tightened in place. There are 2 nuts above the hole for the left-hand air vent and two mirrored in the right-hand air vent. There is one nut to the left and to the right of the instrument panel hole. Two bolts remain just above the radio slot, and you definitely have to remove the radio (if you have one) to get to them. That's it! Since there are so many bolts in so many hole and they're at different angles, it takes some jiggling and persuasion to get them all out.
One happy side-effect of this is I figured out how to tighten the floppy glove compartment. There is a metal strap that hooks into the right-side of the box, loops around the back and ends at a metal bolt on the left side. To tighten the glove box, just snug up the nut on the bolt. Now mine is rock solid!
Instrument Cluster Removal
Note: Updated to reflect no need to cut wires going to light bulbs in the gauges.
I've got a couple of problems with the instrument cluster - burned out indicator bulbs, backlighting bulbs, and the odometer doesn't turn when I drive down the road.
There are 6 Phillips screws around the perimeter of the cluster. It will slide out, but will be held by the odometer cable, the trip reset cable and a mess of wires. To release the trip reset cable, get under the dashboard and find the knob. The knob is held onto its shaft by a tiny setscrew. Loosen the setscrew and slide off the knob. The nut holding the shaft has two tiny vertical slots. You may have a better idea or a specialized tool, but I put the blade of a small flat-blade screwdriver in the slot and gently tapped it. It came loose and I took off the nut and the cable is now loose.
Now on to the wires. In a more modern car, there would be a giant connector that would disconnect all of the wires from the instruments in one shot. In 1973, not so much. Some of the wires are connected to the instruments with push-on spade connectors. Some of the wires do go to a normal connector. Several other wires are hardwired into the wiring loom and go right into the back of the gauges. Let's examine the three instruments in turn. I've read other blogs that say to take pictures of the wires so you can get it back together later. I took pictures and drew each wire's color and position.
Left-side instrument: Brake light, oil light, gas gauge. This multi-function instrument has a bunch of wires and luckily they're easy to handle with spade connectors and sliding out the small bulb holders.
Center instrument: Tachometer, left and right turn indicators and high-beam indicator. This one has a connector that unplugs, some spade connectors, and one light bulb wire that goes to the wiring harness
Right instrument: Speedometer, odometer and trip odometer. This instrument only has 4 wires. One has a spade connector for ground, and three light bulb wires.
There is a cluster of 7 Black/Blue wires that tie into a connector also. These are the instrument backlight wires.
Well, that's it! The funny thing is the car starts and runs without the instruments installed at all. Try that in a car today with a dozen computers running everything from the engine to the navigation system.
Saturday, October 31, 2009
Speakers
The car comes with only two speakers - this was the old school days of mono AM radio. When I got the car, the speakers had been replaced, but they hadn't been mounted to the enclosures - they were just stuffed in place and the enclosure was screwed on. They also distorted like crazy on the highway with the targa top off, so it's time to find some better speakers and securely mount them in place.
The speaker mounting locations on the back side of the enclosures are now non-standard.
In order to stop the metal frame of the speaker buzzing against the plastic of the enclosure, I used a strip of gasket material. I had to use big steel washers to bridge the gap from the mounting point to the speaker frame.
And here we are, fully mounted back in place and sounding great.
Monday, October 26, 2009
Concours in Avila Beach, and The Engine Is Unhappy
Yesterday I drove the 914 down to Avila Beach for the 2009 Concours show. My buddy Gary from G-Rides exotic car performance workshop sponsored the show and had a booth, so I couldn't resist.
The first thing that hit me when I walked onto the golf course show grounds were a pair of Tesla roadsters. I got talking with the guys about my modest electric car project, and the J1772 new recharging connector that was just approved by the standards body last week.
There were Ferraris everywhere, with a nice selection of classic American and European cars. This Porsche GT caught my eye ($440K? Pocket change!)
The downside of the trip was the engine has developed a habit of randomly stalling while driving down the highway... It starts as a shudder, the power coming in and out rapidly. If I beat on the gas pedal it will sometimes re-fire but I had to pull to the shoulder of the highway twice to restart. Once it restarts, it seems fine, but it happened again several times on the way home. The 914 forums say it could be anything from vapor lock to the fuel pump to cracked vacuum lines to the fuel filter to bad gas. I just needed it to run nicely for a couple of months until I start the teardown for the electric conversion, but I don't trust it and I don't feel safe driving it far from home. I don't want to put a lot of time, effort and money into fixing the issue when I'll just be pulling the engine soon, so I think I'll live with it and stay near home. I've got 2/3 of a tank of gas to burn...
I'm refining the project task list, and researching additional parts and repair techniques. Stay tuned!
The first thing that hit me when I walked onto the golf course show grounds were a pair of Tesla roadsters. I got talking with the guys about my modest electric car project, and the J1772 new recharging connector that was just approved by the standards body last week.
Just beyond the Teslas was the brand-new Porsche Panamera, the first 4-door sports car from Porsche. Up close it's not as ugly as in pictures, but it is really, really big. Can't say that I'm keen on it.
The local Central California branch of the Porsche club had a tent. I told them I joined the national Porsche club on the web last week and my information should be forwarded to them soon so they can keep me up on club activities. The lady was very sweet, telling me they didn't care if my car ran or was in pieces, they would still take me. I told her I bought an 914 and I could see her face drop just a bit, but now that Volkswagen has purchased Porsche, we're all one big happy family! I did buy a Porsche key chain for $10 , so now I'm official.
The downside of the trip was the engine has developed a habit of randomly stalling while driving down the highway... It starts as a shudder, the power coming in and out rapidly. If I beat on the gas pedal it will sometimes re-fire but I had to pull to the shoulder of the highway twice to restart. Once it restarts, it seems fine, but it happened again several times on the way home. The 914 forums say it could be anything from vapor lock to the fuel pump to cracked vacuum lines to the fuel filter to bad gas. I just needed it to run nicely for a couple of months until I start the teardown for the electric conversion, but I don't trust it and I don't feel safe driving it far from home. I don't want to put a lot of time, effort and money into fixing the issue when I'll just be pulling the engine soon, so I think I'll live with it and stay near home. I've got 2/3 of a tank of gas to burn...
I'm refining the project task list, and researching additional parts and repair techniques. Stay tuned!
Monday, October 19, 2009
First Body Work
I have no experience with doing bodywork on cars, but I do have a *lot* of experience shaping and finishing wood, so how hard could it be? Ha!
So, off to Kragen Auto Parts to get a bunch of wet/dry sandpaper, sanding blocks, body filler and spatulas. I decided to start with a surface rust/paint chip area just behind the driver's door. It had been worked on before but needed to be re-done from scratch. I put my wire wheel in my drill and ground away the old filler and rust, down to clean metal. Then I mixed the filler and spread it on with a wide spatula. I let it dry overnight and then sanded from coarse to 2000 grit. The filler seemed to have some tiny air bubbles in it, so I mixed another small amount of filler and just topped it off. Another overnight dry, then sanded to 2000. I masked it off and sprayed primer and then a closely-matching silver top-coat. I'm not worried about an exact match because I'll have the whole car painted when I get everything ready. I have no idea why this blog software keeps rotating the picture...! Argh.
With that under my belt, I attacked the trailing edge of the driver's door that had significant rust on the bend and even on the inside edge. I used the wire wheel to grind off all of the rust down to bare metal.
So, off to Kragen Auto Parts to get a bunch of wet/dry sandpaper, sanding blocks, body filler and spatulas. I decided to start with a surface rust/paint chip area just behind the driver's door. It had been worked on before but needed to be re-done from scratch. I put my wire wheel in my drill and ground away the old filler and rust, down to clean metal. Then I mixed the filler and spread it on with a wide spatula. I let it dry overnight and then sanded from coarse to 2000 grit. The filler seemed to have some tiny air bubbles in it, so I mixed another small amount of filler and just topped it off. Another overnight dry, then sanded to 2000. I masked it off and sprayed primer and then a closely-matching silver top-coat. I'm not worried about an exact match because I'll have the whole car painted when I get everything ready. I have no idea why this blog software keeps rotating the picture...! Argh.
I then did the filler and sanding thing again, with great results. I must be getting better at mixing the filler because I didn't have any air bubbles. I then sprayed primer and silver top-coat and it looks great. Now only another 20 or so areas to fix up.
Sunday, October 18, 2009
Who's the U-Boat Commander?
I was reminded of this line from Risky Business, when the young and not yet insane Tom Cruise is at the Porsche dealership after the 928 rolls into Lake Michigan. They open the door and water starts pouring out. Well that was me today. I decided to fill up the windshield fluid tank and attach the air pressure line from the spare tire (I'm not kidding, that's how it works!). As soon as I hooked up the line, I heard a waterfall inside the car. I went around and windshield fluid was pouring out from under the dashboard in at least 3 places. I quickly removed the air pressure hose and got some bowls. The driver's mat got the worst of it so I took it out and rinsed it off thoroughly. I wonder if I'm going to get dribbled on driving down the road now... I'll have to try to clamp off the line somehow.
Wednesday, October 14, 2009
Google AdSense enabled... Do No Evil.
I've just enabled Google AdSense to the blog. This is a big experiment and I hope the ads aren't too in-your-face or have no relevance. I don't have any control over what is displayed, other than they're supposed to have some relevance to the topics discussed in the blog. We'll see how it turns out. If you see something you like, by all means click on it. If not, don't click. Any revenue collected will go directly to the conversion project. So think of your clicks as accelerating the conversion and saving the world all at the same time.
Tuesday, October 13, 2009
First parts order
Well I just placed my first order for parts from Pelican Parts. They are the leading distributor of parts for old Porsches and BMWs. They also have great technical articles that explain how to perform many kinds of parts replacement and repairs. I got the passenger window seal, two CV boots, lithium grease, shift linkage bushing kit and 6 instrument gauge light bulbs, all for $75, with free shipping! Can't beat that. They're located in Los Angeles so I should normally get next-day delivery of anything that's in stock.
Well I'm Committed Now!
I've been thinking about doing an electric car conversion for about a year. My solar power system at home has got me thinking about the impact of energy generation and consumption. I found a half-converted car here in San Luis Obispo, but the owner finally decided to complete the project rather than sell it to me to finish.
I then started looking at Craigslist, car web sites and eBay for possible vehicles to do the project on. I focused in on the Porsche 914 as there are whole-conversion kits available, along with many people who have done the conversion before me and blogged every step of the way. I'm up for an adventure, but I want to make sure it's possible before I start!
I spotted a potential car on eBay near the end of September 2009. It was located about 3 hours away (close enough), silver (best color), working well as-is (drive it home, work on restoration issues before kicking off the conversion) and is a 1973 model with the improved transmission (have to keep that to bolt the electric motor onto). I contacted the owner and it appeared to be a great conversion project car. In the end I won the eBay auction, for $4550, plus $375 in tax later to the Great State of California.
The car was just as advertised, but as it is 36 years old, has several restoration issues that I need to fix: the horn, high beams, windshield wipers, blinker light, odometer, rear-view mirror, side-view mirrors, wonky shift linkage, several paint chips and rust spots, and a few rubber gasket issues. In the end, I made up a project spreadsheet with 53 electric conversion sub-tasks and 78 restoration sub-tasks. This will allow me to track time and money spent on each sub-task so I know how crazy this idea was when everything's complete!
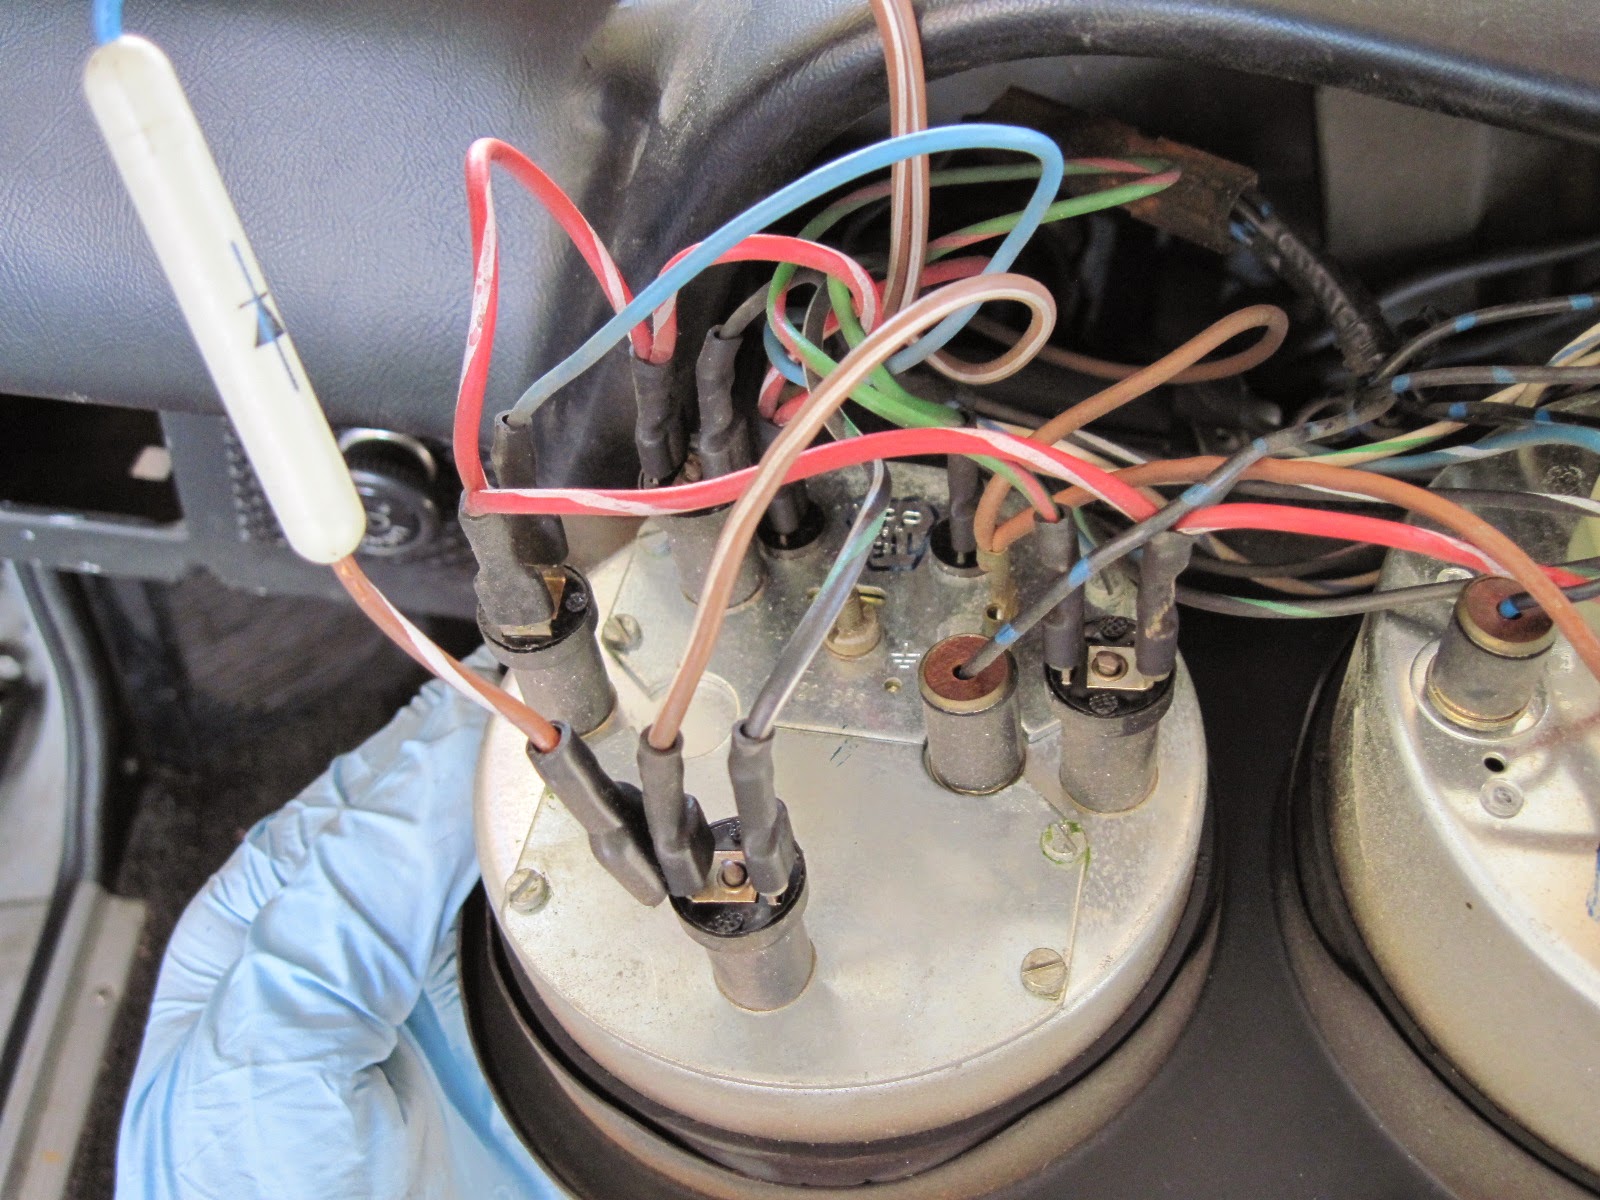
I brought the car home on October 2, and the first thing I did was secure the radio in the dashboard - nothing like a bouncy radio and a rat's nest of wires. I've started my first foray into body repair by working on a couple of easy paint chips and rust spots. I hope to refine my technique on the more challenging spots. Luckily there is no body damage and only a few rust spots that have penetrated the metal, needing deeper intervention.
I plan to work on the restoration tasks first, which will get me through the end of 2009. Then when 2010 rolls in, I'll start on the electric conversion. There's a federal tax credit for electric conversions that gives a credit of 10% to a maximum of $4,000, so I want to spend all of those dollars in a single tax year. The credit expires on December 31, 2011 so I have another year in case things go horribly wrong.
Subscribe to:
Posts (Atom)


