I wanted to know the completed weight of the converted car to get an idea of the net extra weight from the electric kit minus the weight of the removed gasoline engine, starter motor, fuel tank, etc.
Shari at ElectroAuto says the completed car will weigh about 3300 pounds. I'll have the car weighed at a local scale once the project is complete.
According to the car specs, it has a curb weight of 2139 pounds, which includes a full tank of fuel. This means the electric kit is net 1161 pounds heavier. The US-125XC batteries are 67 pounds each, for a total of 1340 pounds, plus 140 pounds for the electric motor. Not counting small stuff, this means 319 pounds of original 914 parts are removed from the car.
1161 pounds represents a 54% increase in total weight, which is pretty dramatic. Luckily the original 1.7 liter engine is pretty anemic, with a 0-60 mph time at 14.0 seconds. Given the extreme torque of the electric motor I'm hoping to match or beat that. My traveling needs trade off acceleration and top speed for distance, so I'll be happy to just get up to traffic speeds in a reasonable amount of time. We'll find out soon.
Sunday, August 22, 2010
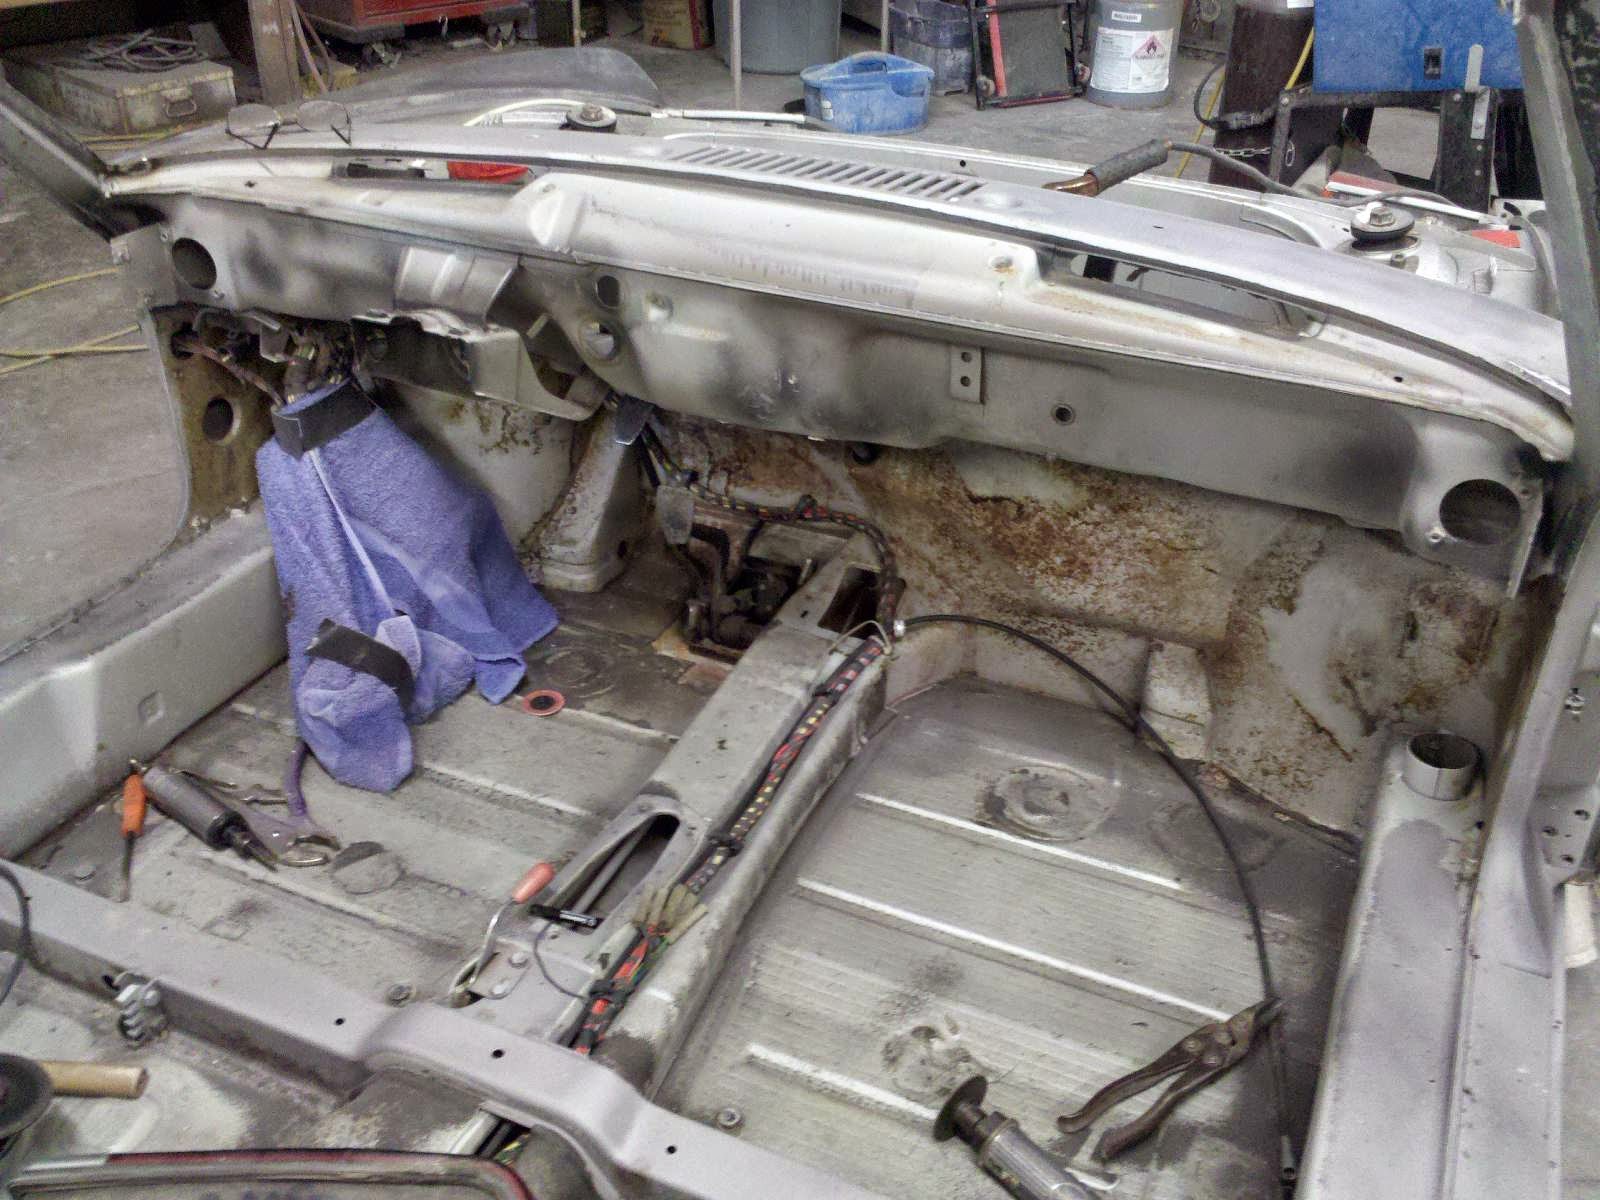
Cleaning the Dirty Bits
While waiting through the delays getting the body and the electric kit parts, I've been working on cleaning the items I pulled off the car and will be re-installing in the early steps. The motor mount bar was caked in 37 years of grime, so I power-washed it, scrubbed with degreaser, coated with de-rust fluid, primed, painted in satin black and clear coated. It's now beautiful!


Next, I started to clean the transmission case. It's full of nooks and crannies, crammed with grime and flaking paint. I power-washed, and am halfway through cleaning with a toothbrush-sized wire brush and degreaser. This is what I started with, second picture is half-complete.


Lastly, I worked on the driveshafts. The trick is to keep water out of the gearing. The shaft appears to be covered in a layer of plastic which is flaking away in some places but still holding tight in other places. The first picture is as pulled off the car, second is ready to go back on.


Can't wait to get the body and the kit and get started!


Next, I started to clean the transmission case. It's full of nooks and crannies, crammed with grime and flaking paint. I power-washed, and am halfway through cleaning with a toothbrush-sized wire brush and degreaser. This is what I started with, second picture is half-complete.
Lastly, I worked on the driveshafts. The trick is to keep water out of the gearing. The shaft appears to be covered in a layer of plastic which is flaking away in some places but still holding tight in other places. The first picture is as pulled off the car, second is ready to go back on.


Can't wait to get the body and the kit and get started!
Saturday, July 31, 2010
Guide coat during priming is on
Rainbow sprayed what they call the Guide coat this week. It's a light black mist sprayed over the primer to give guidance when doing the blocking sanding. The sanding is complete when there are no black specks remaining. This ensures a smooth surface, ready for any last-minute body filler or the start of the final paint coats. Tom found the paint formula for "Porsche Meteor Metallic Gray" so we're getting very close!


ElectroAuto story on National Public Radio
A colleague driving home from work heard a story about Mike Brown and his work with electric cars on NPR (National Public Radio). Of course it wasn't about me (but I can dream...), it was about the original electric car Mike Brown and his wife Shari at ElectroAuto, where I'm getting the electric kit for my 914 project. I should be getting the call to come and pick up the kit within the next few weeks.
Here is the story, you should listen to the audio and read the text as they're not exactly the same.
Way to go Mike and Shari, getting the word out about electric conversion projects, as we approach the launch of several factory-made plug-in electric cars.
Here is the story, you should listen to the audio and read the text as they're not exactly the same.
Way to go Mike and Shari, getting the word out about electric conversion projects, as we approach the launch of several factory-made plug-in electric cars.
Saturday, July 10, 2010
Buying the remaining conversion components
Since we're so close to getting the car back and getting the electric conversion kit, I'm ordering the final components I'll need in the conversion process.
First up is a great piece of kit, a replacement fusebox from JWest Engineering. The original fusebox uses Good-And-Plenty shaped fuses that are held in place by a tiny amount of friction. The new fusebox has modern blade fuses, and bolts directly in place of the original. For only $105, it's a great product that brings the electrical system up to modern standards.
Next is the PakTrakr battery monitoring system. As I've written before, I've chosen this product to monitor the battery pack and have written a custom application for my Droid phone to display the data generated by the PakTrakr in a graphical manner, while tracking real-time trip distance and remaining miles on the charge.
As I've also written before, I'm abandoning the spare-tire-air-pressure-windshield-washer system. I spent many hours trying to retrofit a tiny electric switch where the washer fluid valve was mounted in the windshield wiper / blinker mechanism inside the steering column. Trying to make a tiny yet strong custom bracket just wasn't working out, so I started searching around for a Porsche 924 mechanism, which includes the electric upgrade. I grabbed one for $50 on eBay, which is a great deal. As a bonus it looks like the horn contacts are in great shape too.
I ordered a strip of basketweave material for restoring the dashboard. The dashboard in my car has been hacked over the years, so this should give a nice clean look.
In the near future I'll be buying a Kenwood KDC-BT945U stereo. I've chosen this unit because it has a USB cable that I can connect to my Droid. This will allow the stereo to play the songs stored in the phone, and keep it charged while driving. It also has a Bluetooth connection to allow me to make hands-free calls, with the caller's voice coming through the speaker system.
Targa Top Restoration
The targa top came from the factory with a pebbly / textured surface, but the one that came with my car was chipped badly. I decided to sand the texture off and take it down to the fiberglass, then have Rainbow paint it a smooth satin black. The downside will be fingerprints and potential scratches as I take the top on and off. I think it will be worth it in the end, modernizing the look in conjunction with painting the rollbar with the body color, rather than go back with the vinyl covering and chrome trim.
Here is the targa top in its original state and after I sanded the texturing off. The trailing edge of the top has body filler on top of the fiberglass base. I assume it came this way from the factory, but it could have been done after the fact. Rainbow will do what they need to do, to get it in shape for painting.


Here is the targa top in its original state and after I sanded the texturing off. The trailing edge of the top has body filler on top of the fiberglass base. I assume it came this way from the factory, but it could have been done after the fact. Rainbow will do what they need to do, to get it in shape for painting.


First Primer Coat
I stopped in to Rainbow on Thursday to see that the first primer coat had been sprayed and they were in the process of filling and blocking the panels in preparation for the second primer coat. Getting very close to the end now!


Saturday, July 3, 2010
Ready for Primer Paint
All of the body work is complete! Woo hoo! I stopped in at Rainbow on Thursday and they told me it would be going into the booth for primer that day or Friday.
I've also paid the second half of the ElectroAuto kit bill. I expect to pick it up in about two weeks, just about when the car should be done at the body shop.
Since we're getting close, I went ahead and ordered the replacement fusebox and the PakTrakr components.
Here are some pictures from the body shop, enjoy.


Friday, June 18, 2010
Back from the Blaster
I stopped in at Rainbow this morning, as they have received the car back from the blaster. It's funny to see it as bare silver metal vs. silver paint - can't see much of a difference from a distance.
Everything went as expected at the blaster, except for one area. Apparently the driver's side-rear quarter panel had some damage in the past. They used the drill-a-hole-and-pull-out-with-sliding-weight strategy, which is normally fine. The thing they didn't do was weld the holes shut after pulling the panel back out. They just applied the Bondo over everything, leading to what you see below, where about half of the holes have been welded over. The rest of the panels look great so we have a great body to start the blocking process.


Everything went as expected at the blaster, except for one area. Apparently the driver's side-rear quarter panel had some damage in the past. They used the drill-a-hole-and-pull-out-with-sliding-weight strategy, which is normally fine. The thing they didn't do was weld the holes shut after pulling the panel back out. They just applied the Bondo over everything, leading to what you see below, where about half of the holes have been welded over. The rest of the panels look great so we have a great body to start the blocking process.


Tuesday, June 15, 2010
eBay Auctions for Un-needed Parts
I did my first round of eBay auctions for parts I won't be needing. This included the gas tank and accessories, aftermarket side view mirrors, starter motor, fuel pump, racing harness bar and racing belts. I wasn't able to sell the ash tray, cigarette lighter, rollbar vinyl trim, engine computer, front brake calipers, spark plugs and an oil filter. I guess I'll relist that stuff in a while.
Well I sure learned a lot about selling stuff on eBay.
I have another batch of parts, including high-value chrome trim for the rollbar and the original side-view mirrors. If you're interested, check out the auctions or contact me for the stuff that didn't sell.
Well I sure learned a lot about selling stuff on eBay.
- Get accurate weights on the parts, including the boxes and packing material so your shipping estimates are close.
- Include extra costs to cover any cardboard boxes you might need to buy to do the shipping.
- Beware someone from Spain bidding on your parts because they might win the auction but then back out because of the shipping cost. You thought it was going to be cheap?
- Beware people with no bidding history winning an auction then vanishing off the face of the earth when they're supposed to pay. You don't understand the eBay contract?
- Understand the maximum box sizes for the Post Office and UPS so they don't try to hit you with a $44 surcharge for being 2 inches over the limit. Is the Post Office out of their mind?
- Packing and labeling and taking stuff to the shipping point is a pain in the ass.
I have another batch of parts, including high-value chrome trim for the rollbar and the original side-view mirrors. If you're interested, check out the auctions or contact me for the stuff that didn't sell.
Subscribe to:
Posts (Atom)