Saturday, July 2, 2011

Firewall Reshaping Completion and Battery Box

Well I've been plodding along on the car for the last month or so.  The big issue was completing the reshaping of the firewall to allow for the battery rack.  I pounded the crap out of the metal, then used body filler to get things nice and smooth and contoured.


Then I masked it off in preparation for painting.  Tom at Rainbow arranged for the correct high-build primer and original paint components (urethane paint, reducer and catalyst) and the same color formula.


I sprayed the primer from an aerosol can as directed, then mixed the paint components in the right proportion and sprayed it too, exactly according to the directions.  I used my painting coveralls, respirator and full eye cover..  It was tough getting my spray gun down into the valley at the bottom of the firewall, but it worked out well.  I was very careful about overspray.


Then I sprayed on the clear coat from an aerosol can.


Here she is!  You can see a small seam of paint color mismatch but it will be down behind the battery box and under the vent system.  I just wanted it to be good enough to be a decent match and I'm happy with the way it came out.


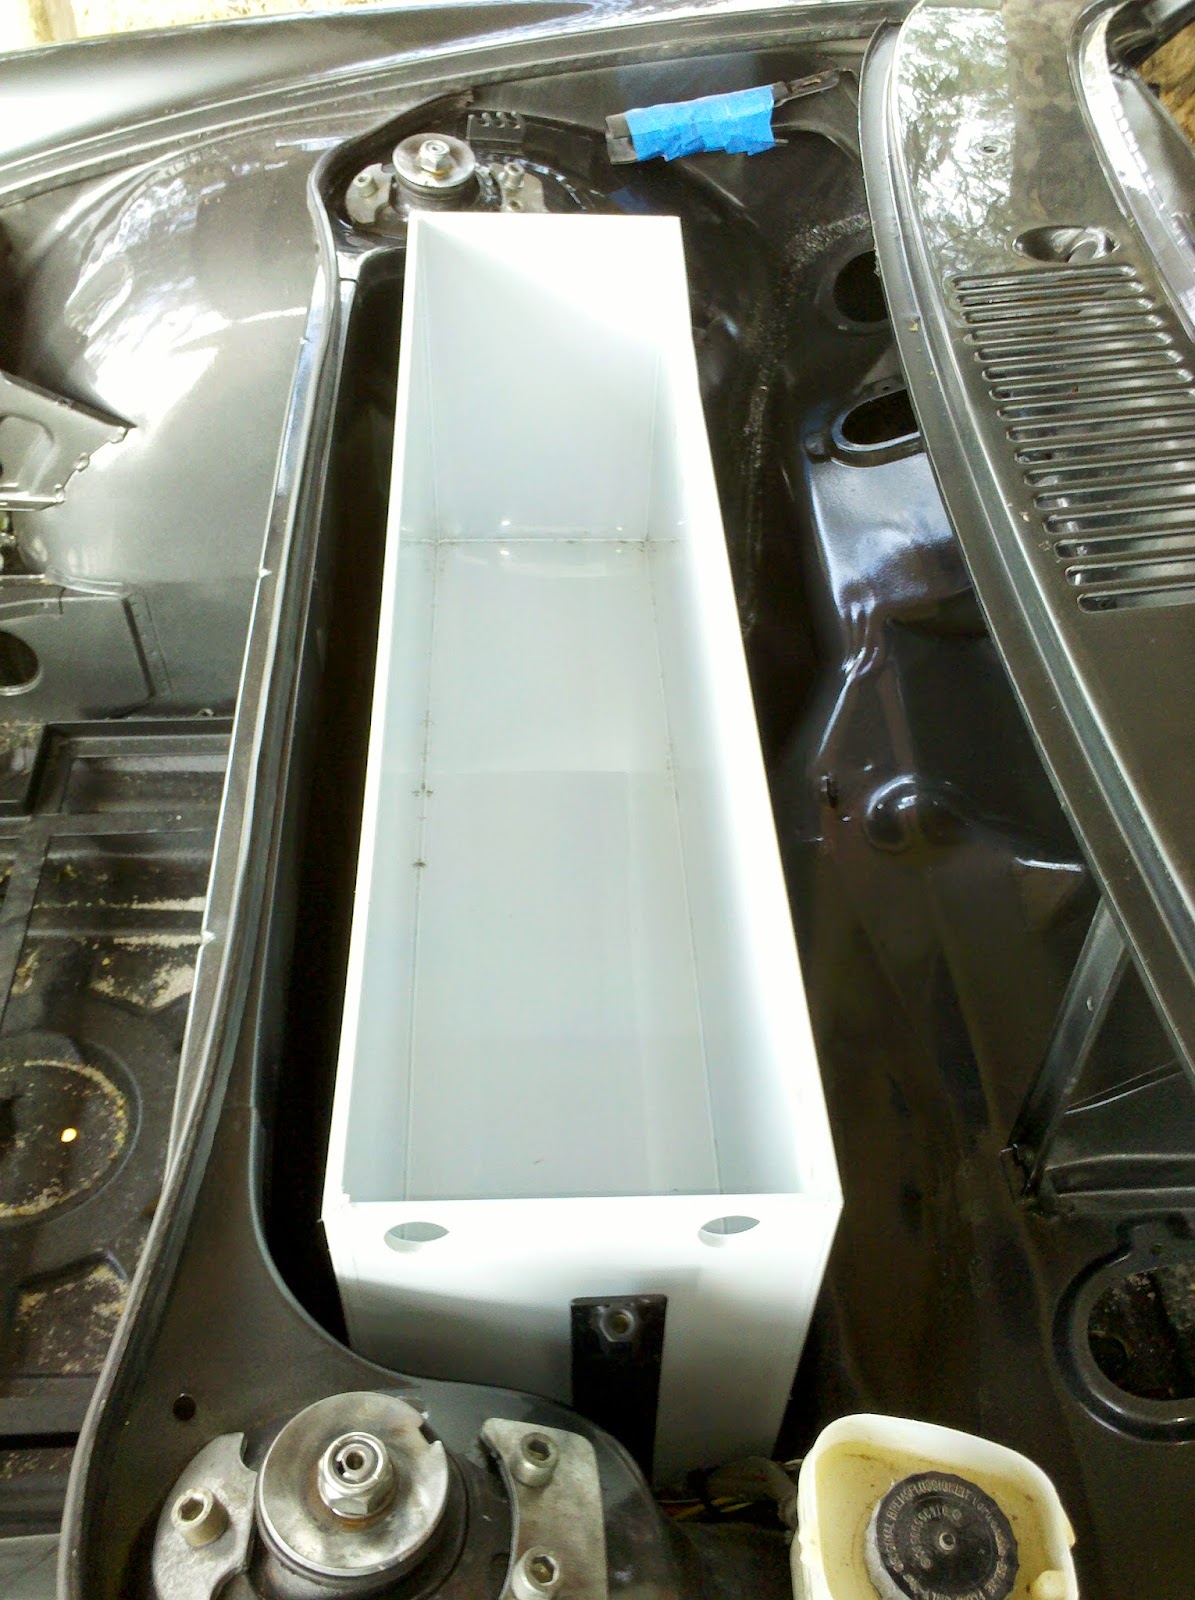
I then bolted in the battery rack uprights and cross-rails.  Getting a wrench under there to tighen the nuts was an adventure.  I kept thinking of the line from The Restaurant At The End of The Universe: "If you've done six impossible things this morning, why not round it off with breakfast at Milliways, the Restaurant at the End of the Universe."  RIP Douglas...


I can't finalize the installation of the battery box yet, because I have to complete the restoration of everything that goes under the cowling: windshield wiper assembly, windshield washer pump and tubing, and the airbox and vent hoses.

Sunday, June 5, 2011

My Visit to the Tesla Store in Los Angeles

I was on a 2-week solar road trip and was in Los Angeles for the middle weekend, including the Memorial Day holiday Monday.  I went around the city checking out touristy things, then remembered there is a Tesla store in the city somewhere.  My GPS found it on Santa Monica Boulevard and I was hoping to just take a picture of it from the outside, not thinking it would be open on the holiday.  Much to my surprise, it was open so I went in.

There was a family already inside talking with Adam Slusser the sales advisor.  I walked around to not bother them, but was following the conversation and I have to say Adam was spot-on about every pro and con aspect of the Tesla cars, the battery and charging technology, range anxiety, etc. to people who weren't knowledgeable on the issues.  I was very impressed.

After they left I introduced myself and we dove into the electric car discussion.  I explained that I knew a lot about the car already and I was doing my own conversion.  He seemed genuinely interested and I brought up this blog on the computer in the showroom.  I went back in time and showed the Tesla pictures from the Avila Beach Concours.

After that he asked me if I wanted to go into the service area.  Um, yes!  I couldn't take pictures due to customer confidentiality, but there were three cars there, two were undergoing sales prep and one candy apple red one on the end was torn into pieces.  Adam explained that it was one of  Elon Musk's, the Tesla CEO, own cars, which was Serial #10, Version 1.0.  It was being upgraded to all of the latest Version 2.5 parts.  He also showed me the battery work room, which I couldn't walk into due to the high-voltage risks, which I understand from my work on solar systems which also have high-voltage DC and AC.  The battery pack unit contains 6831 AA-size cells, but internally it's constructed with a series of 11 swappable modules, each with its own monitoring electronics and cooling system.  They have a rotisserie frame to make it easier to work on these massive units.

Here are some pictures that I got of the cars on display, both were stickered at around $135K.  I like the black one but the green one is a little too bright for me.


I then noticed that they had a display of the motor controller, engine and transmission in the corner.  Adam quizzed me what was interesting about it, and I noticed that it was big enough to have gears so it must be the Version 1.0 two-speed transmission.  I was right!


I then saw the charging station and the multi-adapter charging cables.  There are 8 different outlet adapters available.


Adam said they're approaching the end of production for the Roadster model, at around 2500 cars.  The Model S sedan should roll out right around that time, and news to me was they're working on the engineering kickoff of the Model X SUV/Crossover vehicle.  The goal is to bring electric car technology to the masses at decreasing price points, not continue to focus just on high-end high performance cars.

As I was leaving Adam said he had something for me, and he pulled this out of a cabinet.  Needless to say, this is my new keyring.


In the end, I spent about an hour there, enjoying the tech discussion and savouring the very air of the most successful electric car company in history.

Later in the week I passed the SpaceX building, which is Elon Musk's other company, that is bringing low-cost commercial and eventually human-capable space launch capabilities to the industry.

Wednesday, June 1, 2011

EVTV Electric Vehicle Video Show Site

Our friend Ritchie in Australia turned me on to evtv.me.  The site is a series of videos by Jack Rickard and "Brain" Noto.  I haven't figured out all of Jack's background, but he and Brian used to publish Boardwatch Magazine back in the days of dial-up computer BBS systems.  He also owns two DC-3s and a Lear airplane.

The video series starts off with a description of the electric conversion they did on a Porsche 356 Speedster.  I'm about halfway through the videos on a conversion they're doing to a BMW Mini Clubman.

The videos are a combination of electric vehicle news, deep battery technology analysis, strong opinions on the industry and hands-on tear downs and electric part installation.

Be prepared to spend many, many hours of your life watching the videos.  They do more rather slowly, but it's a good, casual style mixed in with a tremendous amount of valuable information.

I've found the video streaming from the evtv.me web site to be problematic but they have also mirrored their videos on youtube.

Sunday, May 22, 2011

Building weatherproof boxes for the electronics

The standard design from EA involves mounting some sensitive electronic parts and terminal blocks out in the open in the engine compartment, subject to to water, dust and other nasty things.  Working for a solar power company, I've learned to protect this kind of equipment as best as possible to give the car the longest possible life without having to worry about electrical failure, rust and ongoing repairs.

I started with the relay board.  EA supplies a thick plastic board, predrilled for mounting the components.  I bought a NEMA4 rated enclosure sized to fit the board inside.  You can see I had to do a bit of machining to make it fit.


I mounted the relays and the terminal blocks to the supplied board.


I then followed the instructions and wired everything up.


Here's how it looks with the clear cover on the box.  I bought the clear cover option so people can see the internal workings of the system and I can keep an eye on things for moisture intrusion, discolored wires, etc.


Next I moved onto the contactor.  The contactor, a small relay and two terminal blocks are supposed to be bolted to the side wall of the engine compartment.  I wasn't comfortable with that, so I proceeded the same way as the relay board above.  Here's the contactor - it's essentially a very large and powerful relay that is wired between the motor controller and the motor.  It needs to handle 600A of current flow.


The boxes I bought did not have internal mounting plates available, so I found these pieces of plastic sheet at Lowes, and machined one to size to fit into the box.


I spent a lot of time figuring out the best position for each part inside the box, making sure there was enough space for wire bends and clearance for inserting and removing wire connectors.  Here's a picture of the final assembly.  You can't see the clear mounting plate with the protective film removed.


Then I moved on to the potbox.  Alert readers will remember that the potbox assembly wouldn't fit into the space defined by EA because the brake proportioning valve was removed before I got the car, so I had to do something.  I decided to disassemble what EA had me build, and stick it into a weatherproof box.


Here's how the potbox fits insde the box.  Just right.


Another change I had to make was to reverse the mounting of the accelerator cable pivot post.  It sticks up too high, so I'll just flip it around.


I figured the plastic sheet wouldn't stand up to the stress of the moving parts, so I made a metal plate that the potbox will mount to, which will then be mounted to some embedded nuts in the box.


I drilled mounting holes in the box and then into the firewall.  I installed rivnuts into the firewall and bolted the box into place.  I sealed around the bolts and washers with silicon sealant.


Here is the potbox in place, with the accelerator cable coming through from the left side and attached to the pivot arm of the potbox.  When I continue the build and figure out where the potbox cable needs to go, I'll drill a hole and install what we at REC Solar call a pongi - a weatherproof fitting that compresses down on a cable as you tighten it down.  I don't want anything coming into the box.


I'll do the same for the relay board and the contactor box when I mount them.  Well I'm off for a 2-week solar monitoring road trip, so the car gets to sit and wait for me to return.

Final Parts Dribbling In

When I got back from my trip to Infineon, I had a small box from ElectroAuto waiting.  Inside I found:

The lug crimper.  I'm not going to use this because the hydraulic one I borrowed from Kelly is far superior.


The contactor diode.  I can't find anything in the instructions that says which terminals to attach this to on the contactor, so I'll have to do some research later.


Positive and negative terminal posts.  The electrical system design uses these posts to be the main mounting points of the positive and ground parts of the circuit.


Battery box weather stripping.  This sticks onto the top edge of the battery boxes and seals out the elements.


Wiring harness.  This is a pre-built harness to accelerate the process of hooking up various electric bits.


This means the very last parts I'm still waiting for are the hood pins!  I also realize now that I'm at the point of wiring up the high-current DC cables, that I'm missing a copper piece that goes between two posts of the electric motor.  It's a flat copper bar with heatshrink tubing shrunk onto it, with a hole drilled in each end.  I emailed Shari that I didn't realize I was missing this part because it's not explicitly listed on the shipping list.  Of course I didn't get a reply, but I'm hoping it will just show up some day.  Worst case I can fabricate it myself.

Racing 914 at Infineon Raceway

I was up at Infineon Raceway in Sonoma, California to finish up the solar power monitoring system on Thursday and Friday.  Among the amazing exotic cars was this tricked out 914.  The owner said he pulled the original engine and put in a 400+ HP Subaru WRX motor.  It went in nicely because it's smaller than the original and weighs only 25lbs more.  Enjoy.

Warbirds, Wings and Wheels 2011

The Estrella aviation and car museum in my town has begun to host a car show every spring.  I attended for the first two years, but this year I decided to enter my in-progress car to enjoy the experience and talk with people about electric cars.

I had to re-attach the wheels, drop the car off the jackstands, winch it up on the trailer, drive it over, maneuver it into position, winch it off the trailer and roll it into position with no steering wheel.  Setup officially opened at 7AM but I didn't get there until about 8, and the place was virtually full.  I had to park way out at the end, but it was a good location because people seemed to do a loop down the main road and back again, and I was at the far end of the loop.

As you enter the grounds, they were taking pictures of each car.  Here's mine, not the most glamorous shot, but you can see the potential...


This was the main row, with the limit of 300 cars packed into the airplane display area.


Here is the car in position, with an informational sign I made and had laminated and the battery boxes sitting in place.  The electric motor was in plain view and was a good conversation starter.


I really lucked out later in the day when this rare and beautiful Jaguar XK120 parked next to me.  The restoration was impeccable and both cars had nearly the same dark gray metallic paint color.


I talked with at least 50 people about the car and electric cars in general.  The most popular question was, of course, how far can you go on a charge.  Most people seemed happy with the expected 60 mile range, only one person said they needed to go further than that each day.  I think that's a pretty good statistic for the potential for widespread adoption of electric cars.  Most people were very surprised that the car can go 85+ miles per hour.

Next year I'll definitely enter the car again and get it there and back under its own power.  Thanks to everyone who stopped by and took the time for great discussion.  To the person who stole my car polish, microfiber cloths, winch gloves, car exhibitor goodie bag and $40 quart of POR-15 - I hope you die of syphilis.

Sunday, May 8, 2011

Firewall Reshaping

The middle battery compartment fits in where the gas tank used to go, between a vertical wall on the front trunk side, and the firewall on the passenger compartment side.  Unfortunately to fit the battery box in place, you have to "reshape" the firewall.  In fact, it's bashing as hard as you can.  I hated to do this to my new paint job, but I didn't know how to shape it when the car was in the body shop because I didn't have any parts yet.  Did I mention that EA has been tardy delivering my parts?  :^)

So here I am, bashing the firewall into shape.  There is a support bar underneath the steering column that makes for very, very hard bashing, so I crawled into the passenger compartment and cut a section of it out with my angle grinder.

Here is the progression of the bashing and the start of the bondo to leave a nice shape.


I've got the car entered into the Warbirds, Wings and Wheels show this coming Saturday at the Estrella Warbirds Museum at the Paso Robles airport.  I need to get this smoothed out, primed and painted to be ready.  I'll take it over on the trailer and get it in place in time for the start of the show.

Finally Some Electrical Bits!

Now that I've got my remaining electrical parts, I can get started.  I can't do the whole job yet because I'm searching for some "affordable" plastic boxes to hold the contactor, potbox and terminal blocks.  I'm not leaving those out to the elements as the EA manual says.

Anyway, I was able do get started.  This is the supplied DC high-voltage, high-current cable.  It's called welding cable or locomotive cable, and is made up of hundreds of hair-sized wires, so it's very flexible.


EA is supposed to supply a cable lug crimper, but it hasn't shown up yet...  I checked around at work with the electricians I know and found that Kelly Minton has a great hydraulic crimper.  You can see the steps to make a solid crimp below.


You can see the crimper crimps from 4 sides for an extremely good connection.  The final step is to put some shrinkwrap tubing and shrink it down.


I mounted the controller to the backing plate.  This was heavy and messy due to the white heatsink compound.  I built cables and mounted to the controller and the motor.  The rest will come in when I mount the contactor in the box.