Tuesday, January 18, 2011

The Motor and Transmission are In!

I was looking forward to a 3-day MLK holiday weekend and making great progress on the car, with the specific goal of having the motor and transmission mounted in the car, the driveshafts installed and the shift linkage in place.  I managed to get all of that plus a little bit.

Alert readers will remember last weekend we mounted the motor to the transmission and placed it under the car, but stopped there.  I backed the assembly out and worked on separating and repairing the bundle of cables coming into the engine compartment.


I cut the tape wrapping I applied during tear down and separated out the wiring harness that leads to the rear brake lights from the accelerator, clutch and speedometer cables.  I noticed that the clutch cable's outer plastic covering was worn, so I cut out the bad part and slipped a section of heat shrink tubing over the damaged area.


The speedometer cable has a similar worn area, but the connector on the end is far too big to slip a piece of shrink wrap over, so it will have to live that way.

I mounted the new rubber transmission mounts, then pushed the motor and transmission assembly into place and jacked it up to where it was touching the front and rear mounts.  I snugged up the transmission bolts and ran the bolts into the front engine bar mount, pushed the whole thing forward and tightened all four bolts.


I was thrilled to get to this point.  My joy was short-lived though when I realized that I hadn't inserted the front shifter shaft into the hole in the firewall.  I put the lift back in, removed the front mount bolts, lowered the lift down enough to replace the shaft bushing in the firewall and insert the shaft.  I then raised the lift and bolted the motor bar back in place.  Then I installed the rear shifter bar, keying it into the front bar and the assembly at the shifter pivot on the side of the transmission.  I bought a bushing kit from Pelican Parts and replaced the allen keys and plastic bushings.  As Edd on "Wheeler Dealers" would say "The bushes have perished".  These nice new parts will give me factory-crisp shifting.


Unfortunately the rubber boot covering the shifter pivot above was missing on the car and seems to be unavailable on the market.  I'll keep checking but if anybody knows where I can get one, please let me know.

Now I moved on the drive shafts and this is where things got, er, interesting.  The passenger side drive shaft splines went into the hub like hot butter.  I tightened up the hub nut and the CV to the transmission.


Then I went to do the other side.  First I realized that I couldn't maneuver the shaft into place with the shifter installed, so I removed the rear shifter rod.  Then I found the shaft wouldn't fit in the space between the hub and the transmission, by about 1/4".  I had to loosen the 4 bolts holding the motor and transmission assembly in place in order to get that space I needed.

Then I found that the splines on the shaft wouldn't go into the wheel hub no matter how hard I tried.  I took it back out and tried to fit it into the hub from the tire side, still no luck.  Upon closer examination, it looked like the start of the splines on the shaft were slightly damaged, likely by Rainbow tightening the nut down too tight when they removed it.  I got a fine triangle file and gently filed open every spline.


I cleaned the splines on the shaft and the hub and lubed it, then jammed it in, with some help from a rubber mallet, on the tire side and pulled it out over and over until it went in all the way.  I then tried to put it in from the correct side and could just barely get the splines engaged, but no further.  I then noticed a small dimple hole in the end of the shaft and that gave me an idea.  I drilled the hole about 1" deep, then tapped it for a 1/4" x 20 bolt.  I ran in a bolt and grabbed the bolt head with my biggest hammer and pivoted hard against the hub.  To my amazement, it slowly slid into place enough that I could get the nut on and pull it in the rest of the way.  I then bolted the other end to the transmission and tightened up all of the mounting bolts.


I re-attached the shifter shaft, and then went to work, cleaning and installing the clutch cable pulley assembly.


Strangely there doesn't seem to be a protective cover on the clutch pulley assembly.  To me, it should be protected from dirt and abrasion damage.  I then installed the speedometer cable and zip-tied it to the clutch cable.  Behold the awesomeness of the power plant of the car!

Wednesday, January 12, 2011

A Very Busy Weekend!

With the hub adapter in hand, it was time to mount the transmission to the electric motor.  I haven't seen an errata sheet for the EA kit, but I'd sure like to start one.  I've had issues with all 3 steps I've tried to do so far...  This weekend I'm very thankful I live about 3 miles from a Lowes store, as I made 5 trips there... 

Anyway, let's begin.

The first thing I did on Saturday morning was bolt the motor mount to the motor (duh).  You're supposed to position the motor with the wiring studs pointing down.  See how there are only 4 possible holes to bolt the mount to the motor?  Hard to get this wrong eh?  The bolt size of 3/8" in the manual and parts bag is too big, the machined holes are actually 5/8".  So off to Lowes I go.  I bolted it on, and it came back to bite me in the ass.


I then bolted the thick spacer and then the transmission adapter to the electric motor.  These get Loctite'd (not in the kit, off to Lowes I go) and torqued down.  I borrowed a small and large digital torque wrench from my buddy Gary.  These big bolts actually have hex key heads and of course there isn't one in the EA kit.  I don't have a hex key of the right size with a 3/8" or 1/2" socket that will snap onto a torque wrench.  So I saved myself a trip to Lowes and Macgyver'd one up.  I cut a part off of a proper sized hex key, and inserted it into a hex socket of the proper size that snapped onto the torque wrench.


Note that the instructions say only to put the "flat" part to the bottom and the left side.  I thought I did this right, as you can see in the picture above.  This will come back to bite me in the ass.

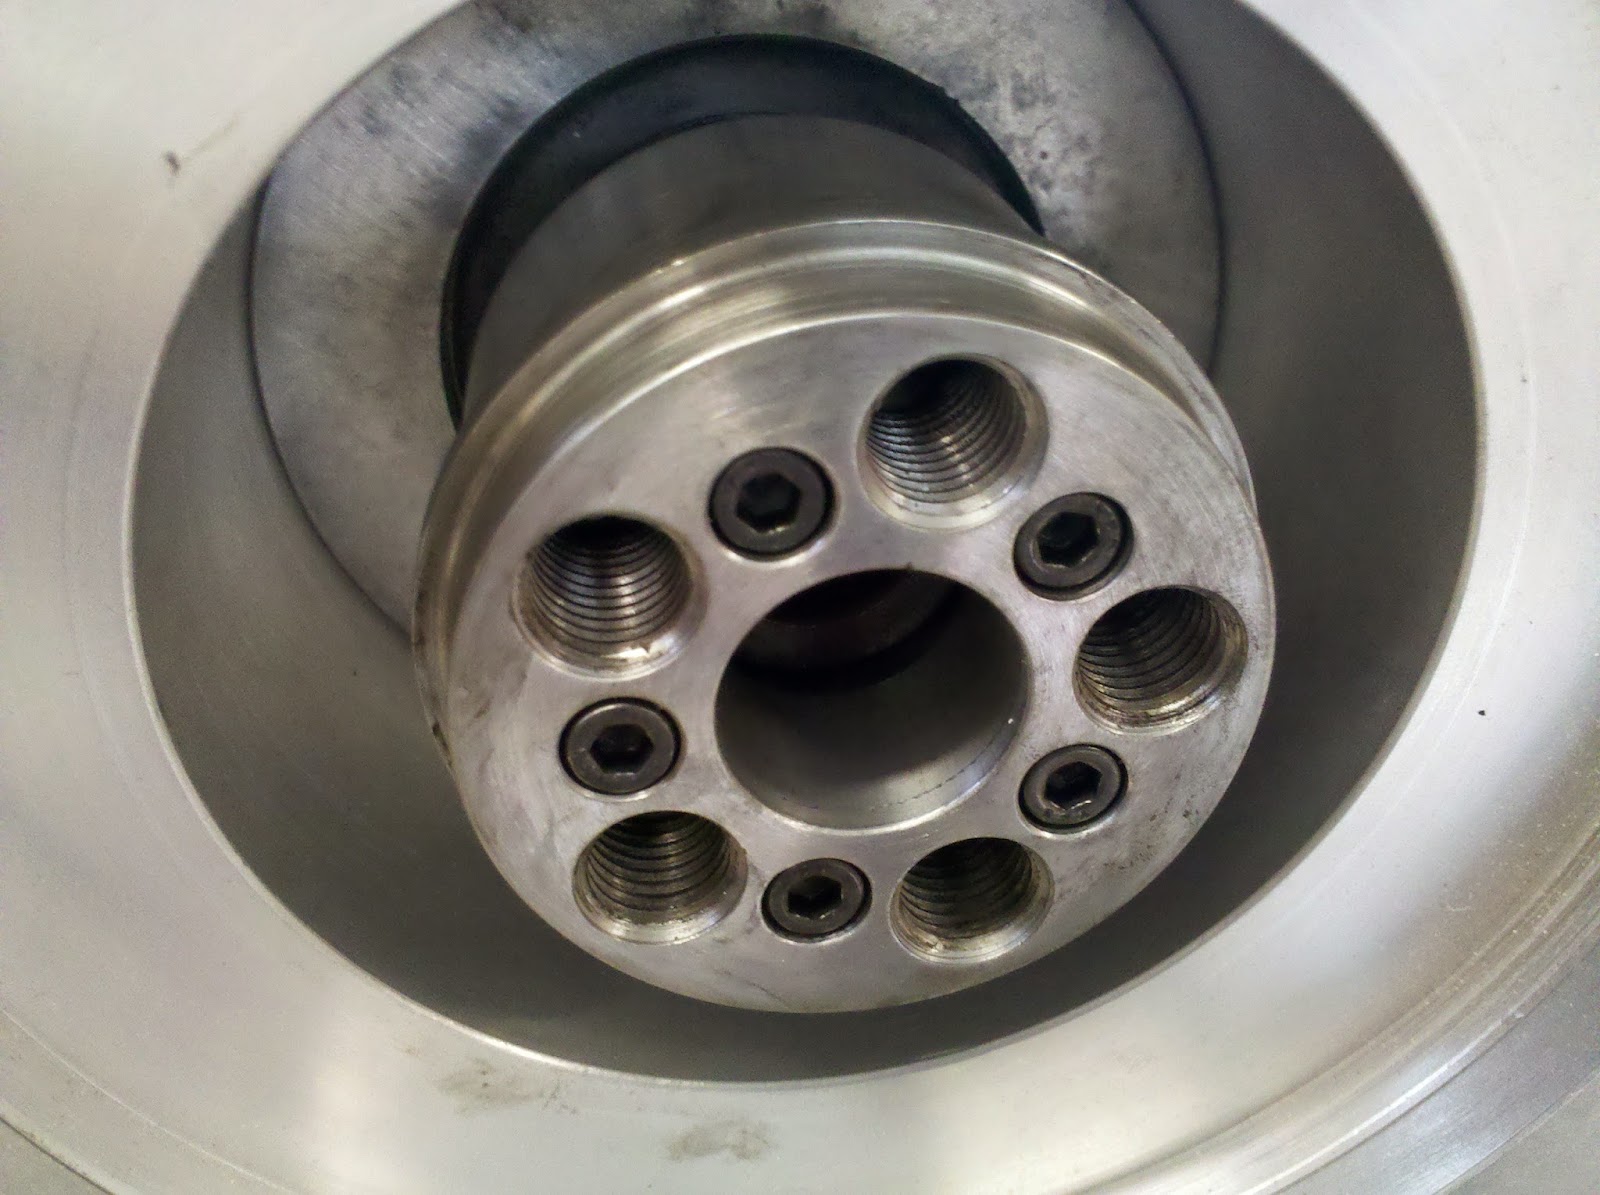
Next I placed the drive shaft key into the motor shaft, then place the two parts of the hub onto the shaft.  You gently tighten the screws pulling the two pieces of the hub together, allowing it to slide a bit on the shaft, to set the flywheel at the proper distance.


Next, I prepped the flywheel by replacing the throwout bearing and O-ring.  These are cheap from Pelican Parts and well worth the investment while you have everything torn apart.  The flywheel is gently bolted to the hub, and then you measure the distance from the outside edge of the flywheel to the transmission adapter plate, very very carefully to three decimal places.  You adjust the distance, and when it's right you carefully take the flywheel off and tighten the hub.  You put the flywheel back on and double check the distance, rinse and repeat.  When perfect, you Loctite the bolts and tighten everything down.


Next the clutch gets bolted in.  The existing clutch in the car was in excellent shape, with no cracks or evidence of oil soaking, so I saved a few hundred dollars by reusing it.  I did buy a clutch rebuild kit from Pelican Parts, and replaced the parts as I went.


Next I moved over to the transmission to prepare it for mating to the motor.  The focus is on the clutch throwout arm and bearing.  This is attached to the clutch pedal via a cable, and causes the clutch to engage and disengage against the flywheel.  The throwout assembly was very grimy and dirty, to the point that the bearing wasn't spinning against the spring tabs on the clutch.  I took it apart and cleaned it well and it started spinning freely.  I replaced the wear and tear parts on the arm, and made sure the arm itself was still flat and true.  The bearing wasn't sliding on the shaft well, so I cleaned everything off and sanded down some rough metal to 2000 grit, then used moly lube and it now slides like hot butter.


Now it was time to mate the transmission to the motor+adapter plate.  After some wiggling, I got it onto the splines and pulled the two together.  This is when I realized the transmission and the adapter plate didn't line up.  This is where the ass biting really came into its own.  It wasn't just a little bit off, it was a lot off.  I couldn't simply rotate the motor around until it matched up because the wire studs and the motor mount would be in the wrong place.  So I took everything off, including those Loctite'd freaking bolts.  I then figured out the correct orientation of the adapter plate to the transmission and  then bolted everything back onto the motor.  The adapter plate was nowhere near the orientation they suggest in the manual.  An accurate statement and a picture/diagram would have been a great help and saved me about 2 hours.  I should have double checked with a dry fit before bolting everything.  I've now learned my lesson and will do so from now on.

I bribed Fred again with pizza and beer, so he came over on Sunday morning.  We had the pizza but forgot about the beer which is probably a good idea.  We were going to be doing heavy lifting and there's no way I could do it myself.  The manual recommends an engine hoist but I figured two middle aged guys could handle it.

Flashing back to yesterday, the motor wire studs are in the right orientation and the adapter plate matches up with the transmission.  But the kicker is the motor mount on the other end is now wildly off.  Remember it can only be mounted in 4 orientations and unfortunately the orientation I need is not any of them; it's somewhere in between.  Now I'm thinking I was sent the wrong motor mount, or the motor manufacturer changed the spec and EA didn't know or didn't update the manual.  I wanted to move forward so I had to drill two new mounting holes.  Of course the position of the holes are blind behind the plate, so I had to insert sacrificial bolts (off to Lowes we go) into the two possible holes, then grind them to a point and lock them into place.  I carefully measured the gap from the mount to the motor, using a socket wrapped in tape to give the right dimension, and the center line of the mount.  I held it in the correct position and Fred tapped the plate with a rubber mallet on each point.  We then drilled out the hole locations and bolted the mount to the motor.  The ass biting was complete.


Now it's time to roll the motor+transmission out of the shop so we can mount the original 914 engine mount bar to the electric motor mount.  I used a nice hydraulic jack I borrowed from Gary, plus a furniture dolly and two pieces of plywood.  Not a recommended design, but it worked for me.


The manual's description and supplied bolts for the bar mount are too long - they run out of thread before tightening down.  The bolt goes into the engine mount bar, rubber spacers with metal sleeve (not listed in the manual), the motor mount and then a nylock nut.  Even by adding several washers it wasn't able to tighten down all of the way.  Off to Lowes we go for a bolt 1/2" shorter.  We bolt it on, then roll the assembly under the car and jack it up into place.


At this point we were losing the light and I decided I needed to clean and paint the transmission and motor mount hardware, so we called it a day.  We made a huge step on the project, but ran into a multitude of problems with the EA instructions and supplied parts.  I'm hoping the quality of the kit improves dramatically.

Tuesday, January 4, 2011

And More Parts

Over the holidays I got notice that EA shipped the motor hub parts, which lets me mount the transmission to the electric motor!  Here are the two parts of the hub and the bolts that tighten them down on the driveshaft.

Saturday, December 4, 2010

More Parts!

I received an email from Shari at ElectroAutomotive that she shipped a box of parts to me.  According to her updated invoice and cross-checking against the parts in the box, I got:

- Circuit breaker, charger mount rubber feet, all battery box holddown studs, mid-exhaust outlet, battery lugs and interconnect straps, hydrometer, bulk wire, 3-wire cable, front-to-rear wire, key switch relay, charger interlock relay, potbox relay, motor overtemp relay, fuse block and fuses, electrical connector kit, trunk lid weatherstripping and the Convert It book.

This means I'm still waiting for:

- motor adapter hub and bushing, motor controller, main contactor, DC/DC converter, battery charger, all suspension parts, heavy cable, wire crimper, cable crimper, engine compartment loom, two high current terminal blocks, battery box weatherstripping and the hood pin set.

I'm glad EA is stepping up and getting me a stream of parts.  There are some significant parts remaining and I'm stuck on the straight path through the steps right now, waiting for the motor adapter hub and bushing.  I'm going to have to jump around a bit, doing what I can with the parts I have.  I'm also doing the renovation in parallel, so there's no lack of things to work on.

Here are the parts in all of their glory:

Sunday, November 28, 2010

The First Electric Part Installation

So I gathered up my courage and jumped into the first step of the installation instructions. 

I cut out the paper template for the motor controller mount and taped it into place.


I got to install my first rivnut.  It's a decent solution to install a blind nut when you can't get access to the back side of the panel.  Since I'm so paranoid about rust, I decided to paint each hole I drill with rust reformer paint.


I then bolted the standoff bracket into place.


Finally I temporarily bolted the motor controller plate with the current-sensing shunt into place.  I don't have the controller yet so I'll have to remove the plate, bolt on the controller and re-mount when it arrives.


Then I decided to move on to the Potbox mount.  I'm a little concerned about leaving the potbox out in the open, where it can get dirt, mud and water inside it, so I plan to make an alternative mounting scenario, placed in a plastic enclosure.  Lucky I thought of this, because my car doesn't match the instructions for mounting the potbox.  The manual shows quite a large "brake equalizer", but mine just has a simple T-junction for the hydraulic brake lines.  I'll have to do some investigation to find out if mine is a post-factory hack or just a different style than ElectroAuto is expecting.  That's the T-junction, right at the top of the paper mounting template, with the line from the master cylinder coming in from the south-east.  It just ain't gonna fit.


Then I decided to review the steps for installing the transmission and motor, and found about half of the needed hardware was not supplied in my parts pickup.  I left a voice mail for Shari and asked her to let me know what's going on with the rest of my order, because I've had no email or phone contact since my visit to them a couple of weeks ago.  We'll see...

Sunday, November 21, 2010

Starting to Build It Back Up Again

Now that the body is back from the shop and I have the first load of electric conversion parts, I can get started on the main event - making an electric car!

Well, I immediately got sidetracked a bit.  When I got the body back from the shop I noticed a small number of points on the body that need to have the paint touched up.  I left the car on the trailer in case Rainbow wanted it back in their shop to do the work.  Now remember I live in an area that gets about 4-6" of rain per year, and it mostly comes between December and February.  Well guess what happened while I was down in LA working on the installation of a monitoring system for my company REC Solar?  It rained.  And the rain got into everything.  Most of the car was OK, but the floor of the passenger compartment wasn't primed and painted, it just had the original coating from the Porsche factory, which is 37 years old and not in the best shape.  It's amazing how quickly the rust stared forming!  I started working on scraping the coating back to clean metal and dry everything out.  When I'm sure it's dry, I'll treat it with the rust converter fluid.  When that's done its work, I'll spray on a new fresh, full new coating of the mystery stuff on the floor.  It seems to be a rubberized undercoating-type compound; I'll check out my options at the auto parts store tomorrow.

I removed the doors and front hood to make sure they don't get scratched during the conversion, and it also gives me greater access to the parts of the car I need to get to.


The pedal mounting area doesn't have a drain hole and the water pooled up nicely.  I had to remove the unit so I can get access to clean and de-rust the area.

Saturday, November 13, 2010

Went to ElectroAuto and got Some of the Parts

After placing my order with ElectroAuto 22 weeks ago, I've had zero contact and I was getting worried.  They promised 6 - 8 weeks for the whole kit.  Did they order my parts yet?  What is ready for pick up?  Did they go bankrupt and my money is gone?  I knew going in that they were well known for delays in sending parts, but when I stopped getting replies I had to take some action.  Luckily I live about 2.5 hours away from their site, so on Saturday morning I prepped my pickup truck and drive up.

My luck continued to hold as both Mike and Shari were home.  They were sure surprised to see me and Mike said I should have called ahead first.  I explained that I had been calling and emailing for several weeks with no response, so I was here to take whatever parts were ready.  They both went to work around the shop and in a couple of storage bins to pull the parts together.  Mike was very helpful, helping me cross-check the parts and showed me how to use the rivnut tool.  He said at one point "We once had 7 people working here, now it's just the two of us and a drunk".  Hmmm.

After about 3 hours of searching, my truck was loaded up with:Warp 9 motor, transmission adapter plate and spacer, potbox, several mounting pieces, gauges, battery frames & holders (but not the Allthread rods), fans and vent piping, Noalox, grease, transmission fluid, bolts & nuts and some electrical connectors.

So that leaves me still waiting for: Curtis controller, contactor, DC/DC converter, circuit breaker, Zivan charger, Allthread rods, all suspension components, cable, battery lugs, battery interconnect straps, crimpers, engine loom, relays, high current terminal blocks, fuse block, battery box weatherstripping and hood pins.  Shari couldn't tell me if the big expensive parts had even been ordered, and only spoke to me and made eye contact once during my whole visit, saying she would check on the remaining parts.

Luckily I can get started and make good progress while waiting for the other parts.

An alternative exists for me to get the controller, contactor, circuit breaker, DC/DC converter, charger and 2/0 cable.  I met a man at the Alternative Car Show at Hearst Castle about a month ago, and he bought a kit from ElectroAuto about 3 years ago for a VW Bus but never did the conversion.  I've emailed Shari and asked if she hasn't ordered these parts, to return my money for them and I'll buy them from this guy.  We'll see if she responds...

So here are the pictures of the parts!


Saturday, November 6, 2010

Picked up the Body

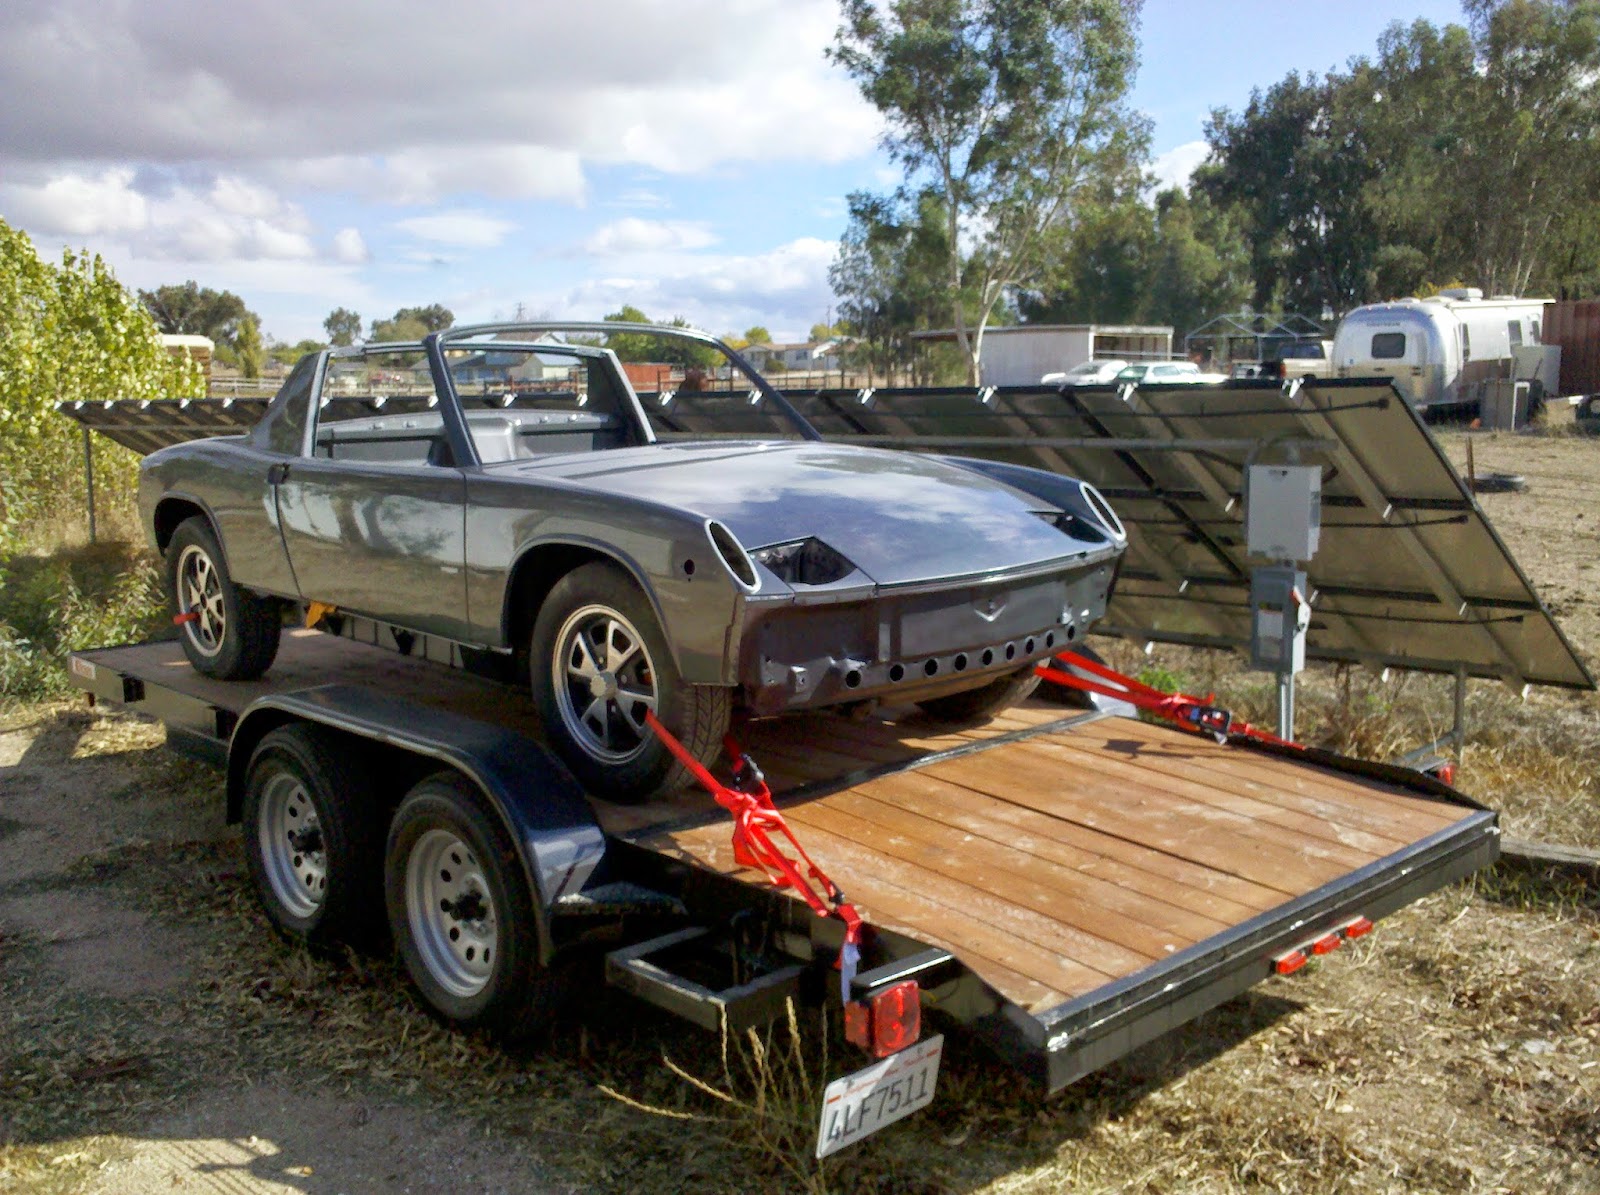
After 170 days, I picked up the car and brought it back to my house.   The targa top still has to be painted, but I can pick that up any time.  Tom and his crew came in on Saturday to help me load it up.  They did a lot of work in that extended period of time, but we had an agreement that they would work on it between insurance jobs, and charged me $10 / hour less than their standard rate since it's a project car.


I figured the best place to park it while I continue my restoration steps and wait for the electric parts to come in was right next to the solar array.


This is a big milestone in the project, and I'm glad Tom and the team at Rainbow did such a great job.