Sunday, July 10, 2011

Rear Battery Rack

I blasted through a lot of work this week, so I'm going to make a small post for each area.  This one is on the finishing the rear (engine compartment) battery rack.

Alert readers will remember my pain of trying to fit the rack into the space.  I had to cut out the engine cover latch and a couple of trays.  The hell-hole didn't start out too bad, but it wasn't completely dealt with by the body shop and rust kept percolating through the paint.  I tried rust-converter and it helped but not completely.  I then went to the POR-15 and painted the whole engine compartment.  It both halted the rust and added to the black motif.  It also covered the scratched paint from all of the times I tried to put the rack in and pull it out again.

Here's the rack support sticking up, waiting for the rack.


You can see the rack is bumping against the semi-vertical brace on the side of the engine compartment.  I've seen others grind the rack away just enough, but I just finished pounding out the firewall, so several carefully placed hits and a grinder to smooth it, the rack had enough clearance.


On the passenger side, there is a triangular plate, which I cut away, leaving enough clearance.


And viola!  The rack is home for the first time in a test fit.  I was surprised by how tight it fit - there's only a few millimeters from the back of the rack to the front of the transmission adapter, and again only a few millimeters between the top of the motor and the bottom of the rack.


Here's where the triangular plate was, after I removed it and ground everything smooth.


And this is the driver's side where I pounded it, then ground everything smooth.


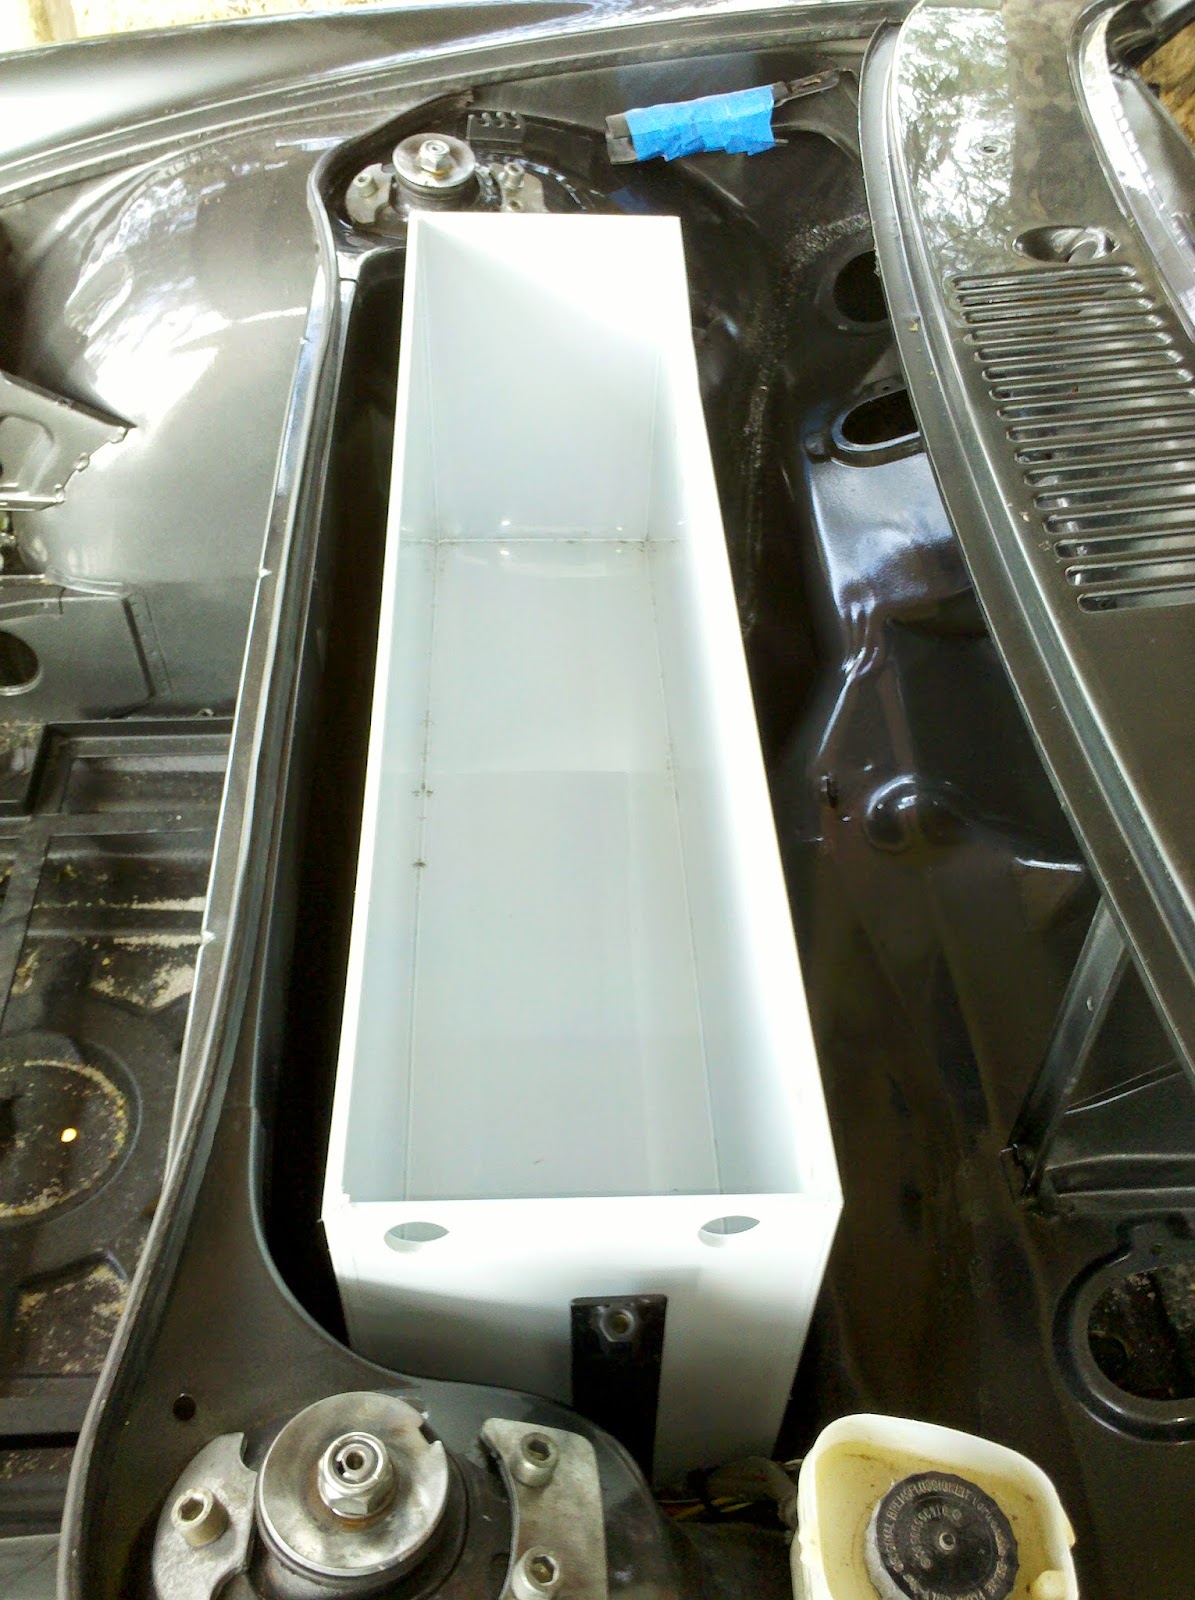
These shots are after the POR-15 treatment.


And now the rack is back in place and ready to bolt to the vertical supports and the metal sheet behind the seats.


And here is how tight the clearance is between the rack and the motor adapter plate.  Just a tiny bit of daylight.


Of course I tried to fit in the battery boxes, but they need a little bit of trimming on the plastic edges.  I'll save that until later.

Thursday, July 7, 2011

Signed up for the EVTV Electric Vehicle Conversion Convention

I've been watching hundreds of hours of video of the EVTV electric conversion guys, and just tonight signed up to go to the first electric car builder convention just outside St. Louis in September.  Check out the itinerary, speakers and expected cars.

It turns out an old colleague of mine at IBM Austin, Fred Behning, is working on an electric conversion of his Bugeye Sprite and will be at the convention too.

Tuesday, July 5, 2011

A flurry of Work - Wipers, Ventilation and Washers

Well it's the 4th of July weekend here and that means I get Monday off for the holiday.  I decided to take Tuesday through Friday off, giving myself a 9 day vacation.  I intended to really bang through a lot of work on the car and so far it's working out well.  The only downside is it's the hottest week of the year, starting at 112F on Friday, slowly dropping to a peak of 96F today.  The car is under a carport on the east side of my workshop building, so it's out of the direct sun, but it still gets very, very hot.  I'm starting early in the morning and staying hydrated, no problems so far.

With the former-fuel tank area successfully reshaped for the battery box, I had to restore and reinstall everything that goes in under the cowl.  Starting in deep and working my way out, I installed the windshield wiper mechanism.  After cleaning, it went in pretty smoothly.  Of course I forgot to take a picture of the control connector during the teardown, but a quick Google search found this great picture on the Pelican Parts forum.


With that in place, I cleaned and reinstalled the central airbox and driver and passenger flapper units, installed the hoses and attached the control cables.  Warning: this is a non-trivial process.  I used a combination of two tutorials on 914 World, an expansion and clarification of the tutorial by Chuckles McGroover (probably not his real name...) on his highly-detailed conversion blog, and the Haynes manual.  My sincere thanks to everyone for their pioneering work in this tricky area.

First I installed the defroster vents.  The original foam gaskets had turned to powder, so I used weatherproofing strips around the edge.  The tricky part came to sticking them through the holes in the metal at the top of the dashboard - the foam would catch and not go through smoothly.  I ended up gently scotch-taping some paper around the foam strips, slid them through the holes and gently pulled the paper out.


I then prepped the air blower box.  When I did the teardown, I found years worth of dirt, leaves and unidentifiable crap inside.  I decided to follow web advice and put a piece of screening material over the top of the box.  My first attempt to hold it in place was with a couple of long zip-ties, but the area is *very* tight and they wouldn't fit and ended up popping off anyway.


The working solution was to epoxy the screening around the edge of the box.  A fairly permanent solution, but I don't intend to be replacing it anytime soon.


Installation was a *major* pain, as it is so tight, right-to-left between the two mounting brackets.  I ended up loosening the upright brackets holding the top of the cowl to the shelf of the firewall.  It was just enough to force it into place and get the two screws started.


I then followed the tutorials to attach the control cables, and mounted the flapper units, then ran some new flexible hose where it needed to go.  So here is the complete job, starting with a wide view, then panning from driver's side to passenger.  I like the black motif.


Finally I worked on replacing the spare-tire-pressure windshield washer system with a small electric pump.  I ran the wires long and fed them through the hole where the washer hose went up into the steering column's valve, and will replace it with the 944 electric control I bought a long time ago.  I bought a new set of squirter nozzles since the rubber on the originals was in rough shape where it fits into the hole in the cowl.


Coming up in the next entry - the engine bay battery box goes in!

Saturday, July 2, 2011

My Last Shipment from Electro Auto?

Today is July 2, 2011 and I think I just got my last shipment from Electro Automotive!  Well I am actually waiting for two final things but I don't know that I'll ever get them.


The final part I am waiting for is the pair of engine cover hold-down pins, but I don't intend to use them so I don't care if they don't show up.

Now, the real final, final part I'm waiting for is the "Motor Field Bus Bar", a copper bar wrapped in heat shrink tubing that mounts between two of the studs on the electric motor.  This part is not specifically called out on the parts list on the invoice, but as I was wiring up the motor I discovered it was missing.  I emailed Shari about the missing part on May 3, almost 2 months ago.  To my utter lack of surprise, I didn't even get a response.  If it shows up before I need to energize the motor, great.  Otherwise I'll build one myself out of copper bars.

I feel a great weight lifted off my shoulders, that I'm no longer subject to the whims of EAs finances, staff or suppliers.  Woo hoo!  To paraphrase Obi-Wan Kenobi: "I felt a great awakening in the Force, as if millions of voices suddenly cried out in joy and were seen driving their electric cars. I believe something wonderful has happened."

Rusty Metal Fixup - Pedal Assembly and Brake Fluid Reservoir Bracket

I was watching a weekend car build/repair show and they talked about this stuff called Metal Rescue.  It's supposed to remove rust from metal parts, bringing it back down to nice metal.  This is different from the rust restorer products which convert and encapsulate the rust into a hard black compound.  I figured it was worth a try because the pedal assembly was a rusty mess.

I bought it in a gallon jug from Summit Racing.  It was significantly cheaper than buying directly from the manufacturer web site.


This is what the pedal assembly looked like at the start.  You can see how hard it would be to sand away all of the rust while assembled, or even after it's torn apart, which is hard to do since some of the parts stay on for good from the factory.


The instructions say to completely immerse the metal in the solution, so I used a 5 gallon bucket.  It wasn't converting quickly so I just left it overnight and checked it in the morning.  It's a pretty interesting product - no toxins, no VOC, water-based.  You just keep using the same solution over and over until it's totally black and won't take off any more rust.


And here's how it looked when I pulled it out.  Excellent results with just some dirt and original paint flecks!


And here is what the solution in the bucket looked like:


I then primed, painted and clear coated the assembly, so I'll be ready to reinstall it at the right time.


The next rusty thing I tried was the brake fluid reservoir bracket.  It's a small piece of shaped metal to hold the reservoir onto its bracket in the cowl area.  Here is what it looked like as it went through the process in a small paint pail.  I decided to put the whole thing into a ziplock bag to see the extent of evaporation.


It removed the rust well, leaving just a bit of original paint.


And this is what the solution looked like afterward.  Yuk!  Liquid rust.


Here's what the bracket looks like back in place after sanding, priming, painting and clearcoating.


I poured all of the solution back into the original container and it went nearly back up to its original level, and was a weak tea color so I think it still has a lot of life left in it.

Firewall Reshaping Completion and Battery Box

Well I've been plodding along on the car for the last month or so.  The big issue was completing the reshaping of the firewall to allow for the battery rack.  I pounded the crap out of the metal, then used body filler to get things nice and smooth and contoured.


Then I masked it off in preparation for painting.  Tom at Rainbow arranged for the correct high-build primer and original paint components (urethane paint, reducer and catalyst) and the same color formula.


I sprayed the primer from an aerosol can as directed, then mixed the paint components in the right proportion and sprayed it too, exactly according to the directions.  I used my painting coveralls, respirator and full eye cover..  It was tough getting my spray gun down into the valley at the bottom of the firewall, but it worked out well.  I was very careful about overspray.


Then I sprayed on the clear coat from an aerosol can.


Here she is!  You can see a small seam of paint color mismatch but it will be down behind the battery box and under the vent system.  I just wanted it to be good enough to be a decent match and I'm happy with the way it came out.


I then bolted in the battery rack uprights and cross-rails.  Getting a wrench under there to tighen the nuts was an adventure.  I kept thinking of the line from The Restaurant At The End of The Universe: "If you've done six impossible things this morning, why not round it off with breakfast at Milliways, the Restaurant at the End of the Universe."  RIP Douglas...


I can't finalize the installation of the battery box yet, because I have to complete the restoration of everything that goes under the cowling: windshield wiper assembly, windshield washer pump and tubing, and the airbox and vent hoses.

Sunday, June 5, 2011

My Visit to the Tesla Store in Los Angeles

I was on a 2-week solar road trip and was in Los Angeles for the middle weekend, including the Memorial Day holiday Monday.  I went around the city checking out touristy things, then remembered there is a Tesla store in the city somewhere.  My GPS found it on Santa Monica Boulevard and I was hoping to just take a picture of it from the outside, not thinking it would be open on the holiday.  Much to my surprise, it was open so I went in.

There was a family already inside talking with Adam Slusser the sales advisor.  I walked around to not bother them, but was following the conversation and I have to say Adam was spot-on about every pro and con aspect of the Tesla cars, the battery and charging technology, range anxiety, etc. to people who weren't knowledgeable on the issues.  I was very impressed.

After they left I introduced myself and we dove into the electric car discussion.  I explained that I knew a lot about the car already and I was doing my own conversion.  He seemed genuinely interested and I brought up this blog on the computer in the showroom.  I went back in time and showed the Tesla pictures from the Avila Beach Concours.

After that he asked me if I wanted to go into the service area.  Um, yes!  I couldn't take pictures due to customer confidentiality, but there were three cars there, two were undergoing sales prep and one candy apple red one on the end was torn into pieces.  Adam explained that it was one of  Elon Musk's, the Tesla CEO, own cars, which was Serial #10, Version 1.0.  It was being upgraded to all of the latest Version 2.5 parts.  He also showed me the battery work room, which I couldn't walk into due to the high-voltage risks, which I understand from my work on solar systems which also have high-voltage DC and AC.  The battery pack unit contains 6831 AA-size cells, but internally it's constructed with a series of 11 swappable modules, each with its own monitoring electronics and cooling system.  They have a rotisserie frame to make it easier to work on these massive units.

Here are some pictures that I got of the cars on display, both were stickered at around $135K.  I like the black one but the green one is a little too bright for me.


I then noticed that they had a display of the motor controller, engine and transmission in the corner.  Adam quizzed me what was interesting about it, and I noticed that it was big enough to have gears so it must be the Version 1.0 two-speed transmission.  I was right!


I then saw the charging station and the multi-adapter charging cables.  There are 8 different outlet adapters available.


Adam said they're approaching the end of production for the Roadster model, at around 2500 cars.  The Model S sedan should roll out right around that time, and news to me was they're working on the engineering kickoff of the Model X SUV/Crossover vehicle.  The goal is to bring electric car technology to the masses at decreasing price points, not continue to focus just on high-end high performance cars.

As I was leaving Adam said he had something for me, and he pulled this out of a cabinet.  Needless to say, this is my new keyring.


In the end, I spent about an hour there, enjoying the tech discussion and savouring the very air of the most successful electric car company in history.

Later in the week I passed the SpaceX building, which is Elon Musk's other company, that is bringing low-cost commercial and eventually human-capable space launch capabilities to the industry.

Wednesday, June 1, 2011

EVTV Electric Vehicle Video Show Site

Our friend Ritchie in Australia turned me on to evtv.me.  The site is a series of videos by Jack Rickard and "Brain" Noto.  I haven't figured out all of Jack's background, but he and Brian used to publish Boardwatch Magazine back in the days of dial-up computer BBS systems.  He also owns two DC-3s and a Lear airplane.

The video series starts off with a description of the electric conversion they did on a Porsche 356 Speedster.  I'm about halfway through the videos on a conversion they're doing to a BMW Mini Clubman.

The videos are a combination of electric vehicle news, deep battery technology analysis, strong opinions on the industry and hands-on tear downs and electric part installation.

Be prepared to spend many, many hours of your life watching the videos.  They do more rather slowly, but it's a good, casual style mixed in with a tremendous amount of valuable information.

I've found the video streaming from the evtv.me web site to be problematic but they have also mirrored their videos on youtube.