Thursday, July 26, 2012

My Visit To The New Tesla Store in Los Angeles

I was working down in LA at a solar project and at the end of the day I drove over to the Tesla store I visited last May.  To my surprise, it's in the process of being converted to a service-only location, to support the Roadsters and the Model S sedans rolling off the assembly line now.  The sign below shows they've opened a new location in Santa Monica.


I didn't understand the Promenade concept until I got there - the street is blocked off to traffic and is a pedestrian-only area.  This is the entrance to the new Tesla store.  It was probably a trendy women's clothes store in the recent past.


It's pretty narrow, but the layout was designed by George Blankenship, the designer of the Apple store concept, to use the space efficiently.  Right in your face is one of the gorgeous hand-built Beta Model S cars.


The front trunk, or "frunk" as they call it, is about the size of a spare tire but very deep so you could put a lot of grocery bags or a couple of suitcases inside.


The rear trunk in this model shows the jumpseats.  A young couple was closely checking these and the baby seat mounted in the back seat.


Behind the display car is a rolling chassis showing the suspension, battery pack and motor / transmission.


On the walls are all of the materials you get to choose from on your car, interior and paint and some Tesla merchandise.  I picked up a metal license plate frame for the 914.


I walked around soaking it all in until I re-introduced myself to Adam, who I met a year ago at the other store.  We talked about the car and then he let me sit inside it.  Even for a hand-built car, it had magnificent fit-and-finish.  From the outside, the whole dashboard looks digitized...


Once inside, the effect is even stronger.  The normal place for driver's gauges is a non-touchscreen display, showing things like speed, state of charge, climate and audio settings.


In the center of the dashboard is this magnificent 17" touch screen display that handles every aspect of every system in the car that you could imagine.  Even the sunroof position is controller by a graphical slider.  Adam says there are no restrictions on the driver using this screen while moving, but if the government puts any regulations in place, they're ready with a software update process.


To get a test drive, you have to put down your refundable $5000 deposit and then wait until later this year or early next year once the factory produces enough cars to fulfill all of the currently pending orders.  The test drives will be run out of this store for the LA area.

It was great to see Adam again and realize how far Tesla has come in the year since I went to the old store.  I bought some Tesla stock back in January and it's been on a bit of a roller-coaster ride but I'm happy to hold out for the long run when the "shorts" get punished for not believing in the vision and execution of whatever Elon sets his mind to.  My stock gains won't buy me a Model S but I can always imagine...

I even picked up a souvenir!


Monday, June 11, 2012

Solar Carport and EV Charging

Yesterday I picked up my building permit for an additional solar array at my house.  My goal is 3-fold:

- Generate the remaining 15% of my house's power needs that I'm currently buying from PG&E
- Generate sufficient power to charge the 914 through a J1772 charging station
- Park the cars under a carport to block the direct sun and scorching summer heat

I bought the electrical parts for my system from my sister company AEE Solar and the carport from Protective Weather Structures in December of last year.  I've got a SnapNRack mounting system, 16 REC Group 240PE modules, a Schneider Conext 3300 inverter (which I will pull the data from and display in conjunction with my original Xantrex inverter), and a Schneider J1772 electric vehicle charging station.

A friend at work did my solar design and ran the calcs for my rebate application, and I worked with PWS's structural engineer on the final details of the carport structure.

Now that I have my permit, I can give PWS the green light to start fabrication of the metal, I'll call 811 to get them to mark any underground electrical services and I can start digging holes.

Here is a rough SketchUp model I made of the system.  The only SketchUp model I could find of a 914 was only half completed, so that's why it looks like it's missing most of the right side of the car.

Sunday, June 10, 2012

Solar Charged Driving

The car is complete!  Well, there will always be a few things to work on, but as soon as I sign a collector-car declared-value insurance policy, I'll feel free to jump into the car and hit the open road.  Well, as long as the road isn't too long.  I took a bunch of pictures of the car next to my solar array, looking for the best glamour shot to have new project cards printed up.  I just wish I didn't have the white storage container in the background.  Anybody with good Photoshop skills want to take it out for me?

I've been a fan of Christof Demont-Heinrich's SolarChargedDriving.com site since it launched, and I've been itching to post about my solar-charged electric car project for a long time now.  I've sent Christof a note now that I'm done and I hope that we can work on an article.

Enjoy.


Tuesday, June 5, 2012

San Luis Obispo Concours


We had a great car show on June 3, 2012 down the road a bit in San Luis Obispo.  It was held on the grounds of the Madonna Inn.


First thing to hit my eye was this staggeringly beautiful Mercedes 300SL gull wing.


And the modern Mercedes SLS AMG gull wing, a 12 cylinder, 6.2 liter monster.


This Carrera GT is owned by a local Porsche club member and is popular at every car show in the area.


This is my first Ferrari Enzo.  Just brutally fast looking, like it's murdering the air flowing around it.


Ferrari row.


There was a row of refreshment tents, including this Space Shuttle-shaped rolling diner.


Another first for me, and the world, is this Fisker Karma.  I had a great talk with the rep about the details of the car and electric cars in general.  I gave him one of my project cards, so perhaps he's reading this now!


Beautiful from every angle.  Henrik Fisker was a designer at Ford, BMW and Aston Martin, then branched out into his own design and coachbuilding company.


150 watts of solar on the roof.


 This is the new 2012 Porsche Carrera 911, code name 991.


You can tell by the skinny tail lights.


The price sticker however is not very skinny.  This is the S version, but $126K, really?

Final Weight

I took the car to the scale at our local landfill and got the final build weight.  She came in at a svelte 3380 pounds.  Alert readers will remember the previous post saying that the car rolled out of the factory at 2139 pounds and EA estimated it would end up at 3300 pounds, so they weren't far off.

This means the car is a net 1241 pounds heavier, which is 58% more than the engineers in Stuttgart intended.  Clearly the upgraded shocks, springs and struts were needed!


Sunday, May 27, 2012

Trusting the Charger

Alert readers will recall that I was having doubts about the effectiveness of my charger.  I was alarmed to see it was driving my 120V DC battery pack at 153V DC, when the sticker said it should be 143V DC!

After I called the Zivan repair service and described what I was seeing, they told me to send it in for testing.  After they ran it on the bench, I got a call from Mark, saying it was fine.  Here's what he said, any errors or omissions are mine.  I've been learning about the mysteries of battery packs on the streets and shady blogs, so I was happy to have another data point.

Mark said that the pack should be overcharged.  Specifically my pack should be charged aggressively up to 157V with the T-125 battery setting "4" on the rotary switch.  If I'm concerned about charging it too hard, I can set the switch to "3" which offers a slightly gentler charge for T-105 type batteries.  After 12-18 months the batteries should be mature and I can switch back up to "4" and drive them a little harder.  110% - 115% overcharge is OK.

The lower-voltage cells have to be allowed to charge up to the level of the higher-voltage batteries.  This is what Jack Rickard calls a "top balancing" scheme, which he says is wrong for lithium batteries, but he doesn't believe in lead-acid so it may be valid.

For the charging-state LED, a fairly-long yellow is OK, which represents the 80% to 100% stage.  I thought it should be much shorter, adding to my distress over the observed voltage.

Now having explained all this, I still have exactly the same symptoms that another person at Zivan diagnosed the charger as faulty and I should send it in.  This exercise cost me $70 plus shipping with nothing to show for it but a little more knowledge.

After I redid the whole charging system with the J1772 connector wired in, I did a short 3 hour charge and took it to the car show.  I noticed that the performance was rather sluggish, but the voltage was right about 120V DC and the PakTrakr state of charge was 100%.  Yesterday I decided to trust the charger and let it go through the full cycle without panicking and pulling the cord.  Well imagine my surprise when it put 13.11 KWH into the pack over the course of 10:33.  I had been doing about  8 KWH over 6 hours previously.  The voltage peaked at 153.3V DC and dropped down to 132.2V DC shortly after disconnecting the charger.

13.11 KWH is far beyond what I calculated for the 80% to 100% charge capacity, so I'm hoping that the pack was just very thirsty because I hadn't been charging it all the way up.  I did a short drive around the back yard today and the acceleration was neck-snapping like I remember from my first drive.  I hope I haven't damaged the pack.  If you know me, you know I'm a bit of a pessimist and I have this sinking feeling in the back of my mind that I now own a 10 mile pack.  Well, I'll do some range testing and see how it looks.  I just don't have the spare cash for a lithium pack so I'll have to make this work for as long as I can.


PakTrakr For Android Published to Google Play Store

Well I followed the 97 (it seemed like) step process to prepare the PakTrakr For Android app to be published in the Google Play store.  I made extensive notes so I won't have to re-learn everything for version 1.1.  After a few hours of Google magic processing, it showed up.  You can find it if you search for PakTrakr.  Here's a screen shot of how it looks in the store.  Google does a nice job presenting the app with the screen captures I made, and making it easy to click away 99 hard-earned cents!  I was going to make this initial release free as we work through any bugs and enhancements, but if you make it free from the start, you can't make it a pay-app in the future.  Others have worked around this by having a fully-featured pay app and a cut-down free app.  As a user, I don't think there's anything that I would want to have removed so I decided against the free version.

The "manual" for the app will always be here, so check for the latest updates.

Tuesday, May 22, 2012

Warbirds, Wings, Wheels and Major Awards

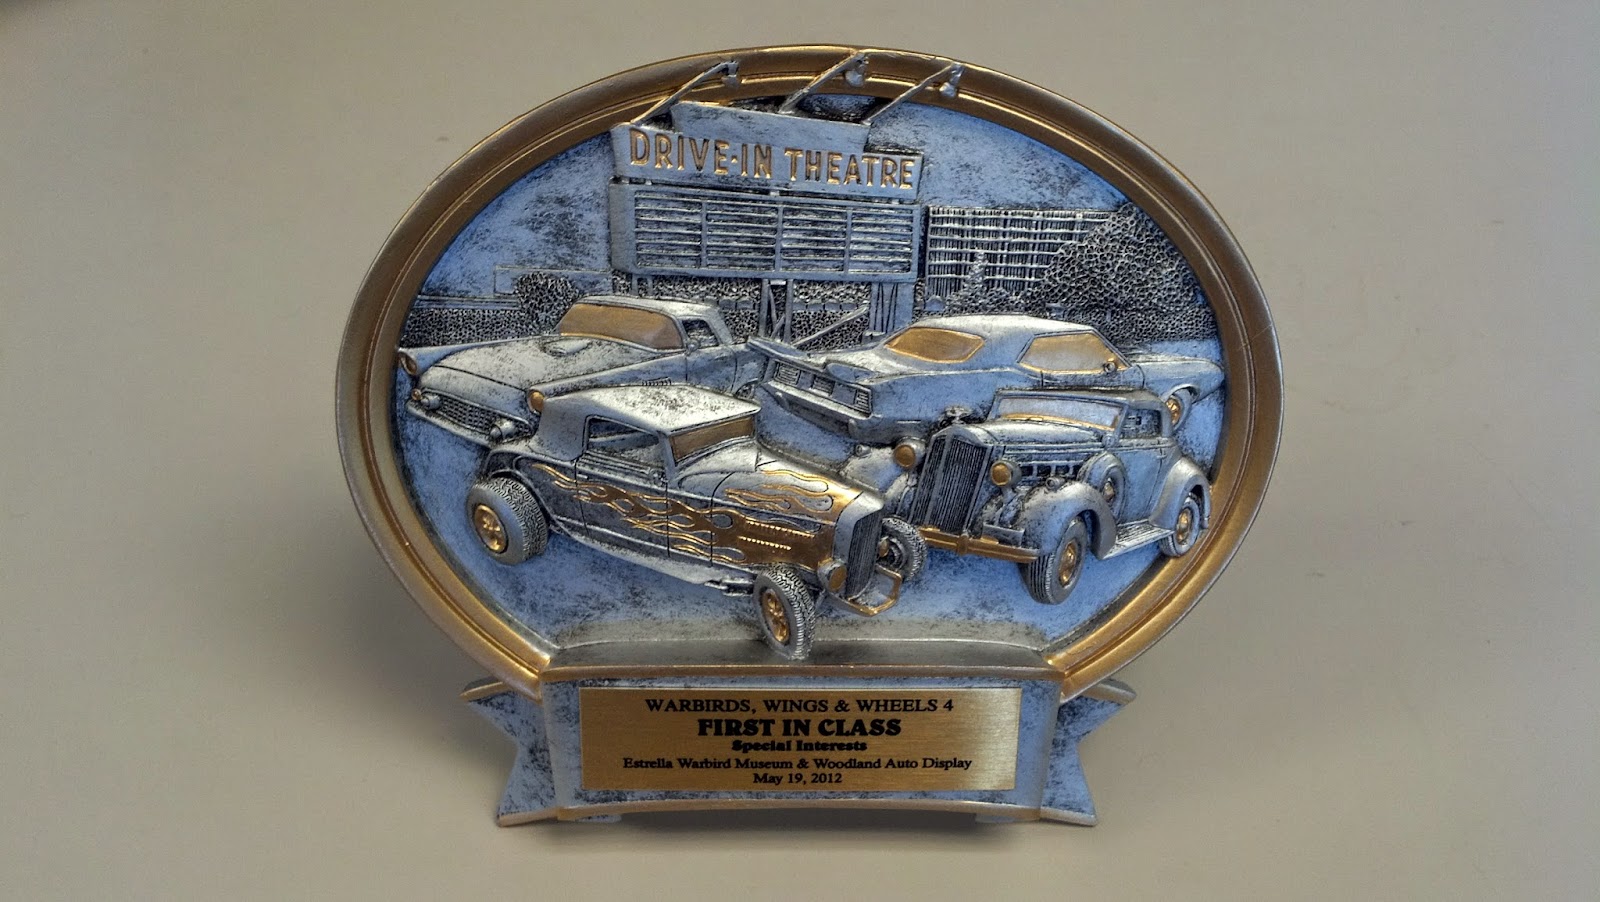
Well it's not the glow of electric sex in the front window like Raphie's father got, but this weekend I picked up a major award myself - the First In Class trophy for "Special Interests" at the Warbirds, Wings and Wheels 4 car show in Paso Robles, California.

Here she is, hoods up and targa top off in all her Teutonic electric glory.  I must have talked with over 100 people about the car and electric cars in general.  I got some nice comments about the build quality, something I spent an inordinate amount of time on.  I also dispelled some rumors about the Chevy Volt fire, range anxiety, electric vehicle cost, last week's Fisker fire, Tesla's imminent release of the Model S, Communists and Socialists...  About a dozen people remembered the car from the Warbirds show last year as an empty shell, with my promise of having it built and running by next year's show.  I don't think any of them thought I was going to pull it off, and frankly at times neither did I!


They had me lined up directly across from Corvette Row, which was ironic given the amount of gas they burn.


With a jet fighter of some kind pointed right at me.


The organizers were expecting up to 500 cars to show up.  I didn't get much time to walk around but there were cars as far as they eye could see.


 At the end of my row was this Iwo Jima-experienced P-51 Mustang, named Dolly.


And here's my major award, a 3D image of a classic American icon - hod rods at a Drive In theater on a Saturday night.  Well my little electric 914 is not quite in line with the image, but the judges seemed happy to have me and I was happy to be there.  Next up, the Gathering Of Friends VI all European car show at Laguna Lake in San Luis Obispo on July 15.

Sunday, May 13, 2012

J1772 Charging - The Joy and the Agony

I continued with the work on the J1772 upgrade from yesterday.  Here I've tidied the wiring and zip-tied the wires in place.


I painted the gray epoxy repair holding the front battery in place with white plastic paint.


The box is now mounted to the side of the battery box.  You can see the nut holding the transformer bolt into place.  This will cause me some anguish shortly, I should have seen it coming...


Finally the battery box is back in and the batteries are dropped into place.


The batteries are wired up and the PakTrakr leads are all re-installed.


I did another 120V and J1772 test, both passed!  Note that I didn't tie the box's 120V output into the charger yet, so there's no load on the output.


Since the initial side-mounting for the relay box was inaccessible, I decided to mount it right on the top of the front battery box cover.  This will give me easy access to the fuses and the wiring.  I got another PVC enclosure and put the cable glands on the right side.  I attached heavy strength Velcro to the bottom, so if I need to get to the batteries, I pull the box off the Velcro and move it to the right side.  Now I just have to move the redo all of the wiring.


And here is the final result!  This is now the overall front trunk layout.  Dual charging plugs are on the left, control circuitry in the middle in a NEMA-rated enclosure, and a twist-apart AC disconnect on the right side.


Here's a close-up of the control circuitry.  Moving it to this position makes it far easier to check for blown fuses and future upgrades.


After the wiring was complete, I plugged in for yet another charger test.  Note that this was the first one with the load of the charger filling the battery pack.  After a few seconds, I saw smoke coming out of the J1772 box!  Fudge bucket!

That led to an adventure of getting the J1772 box out.  I had two problems that I should have recognized during the design.

First, the bottom bolt is mostly inaccessible - I could touch it with my fingers, but couldn't get a wrench on it.  I ended up taking out the battery adjacent to the J1772 box and drilling out the bottom bolt from inside the battery box.  I won't replace the bottom bolt because it's not necessary for holding the box in place.

Second, the big nut on the outside of the cover on the transformer bolt is about 1/4" too long and the side of the headlight area was blocking the box sliding up.  I managed to get a ratcheting socket on the nut and got it off, but the bolt was still too long.  After a lot of swearing, I drilled a 1" hole through the wall of the battery box where the head of the transformer bolt is.  I then backed out the bolt through the hole.  The J1772 box then lifted right up.

My guess was that I had botched the wiring on the AVC1 board and melted it, but when I opened it up, I found the board seemed to be in good shape, but the small wire I used for ground was crispy where the insulation used to be.

I sent an email to David Kerzel of Modular EV Power at 7:00 PM on a Sunday night hoping for a reply sometime tomorrow but he wrote back in 30 minutes!  He asked some questions about the wiring, so I've sent him my schematic and we're going back and forth on the problem.  Great customer service!


I need to get the car rolling for the Warbirds, Wings and Wheels car show this coming Saturday!  Luckily I have about 80% charge and the show is a couple of miles from my house so the charging circuit doesn't really need to be working for the show.  I'll just re-mount the box and tell everyone it works perfectly!  Update: It did work!

Here is the schematic of the full charging system.